
I have a fascination with 18th and 19th century dioramas, shellwork and grottos. I love the use of natural items to create miniature worlds. Long before the internet and before I had seen an 18th or 19th century version I had assembled boxes of found natural objects. Shells and things of the sea have always called out to me, but also rocks, feathers, seeds, lichen – so much beauty to be found in these objects.
Boxes made in the late 70s-early 80s using many natural objects.
Lately I’ve taken to making the items I can’t obtain otherwise.
While I have been able to obtain a few antique versions, many are either in museums, out of my price range or impractical to ship. I am drawn to the whimsical and magical settings in the early pieces – scale didn’t seem to matter and there were often very unusual mixtures of objects. I’ve tried to capture that feeling in my 18th & 19th century inspired pieces.
So far, I have made 13 shadow boxes, dioramas and shell scenes inspired by antique versions that I’ve seen. Many of them incorporate antique dolls since this has always been an area of interest. Here are some of the boxes that have been made since 2020.
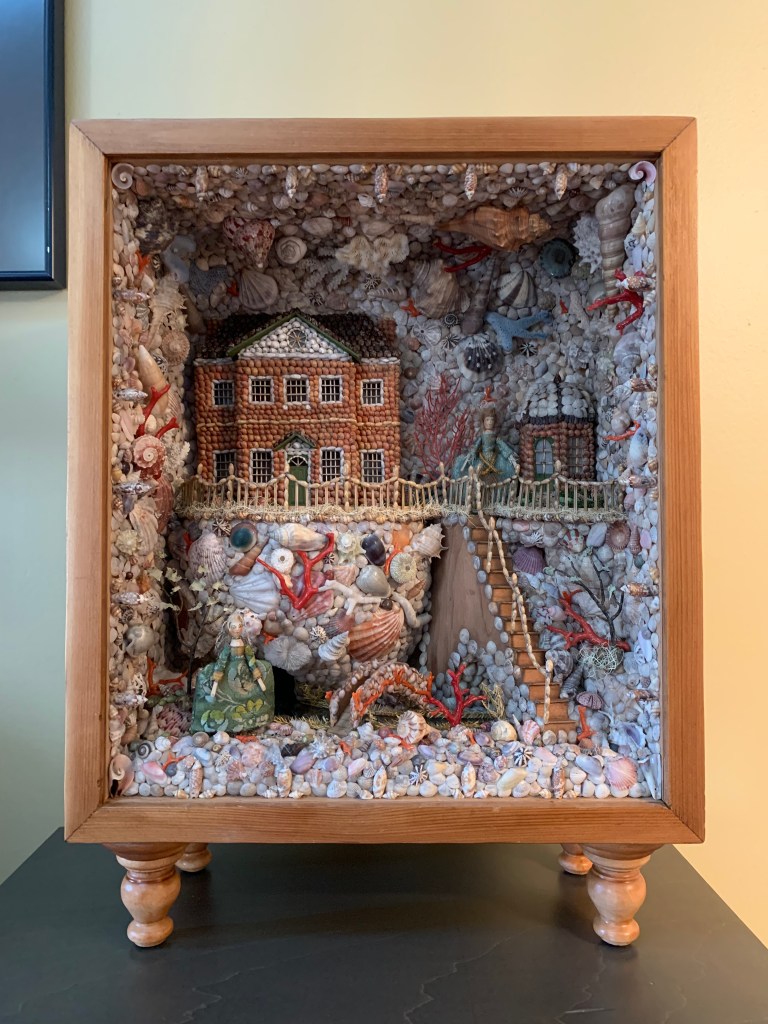
Look for Me at the Coral Bridge…
First of the antique inspired boxes.
The first one was inspired by 18th century Shellwork grottos that were made by Quaker women in the 18th century in Philadelphia. One is currently part of the Williamsburg Museum Collection and one is part of the Stenton Collection. When I first saw these I was just so entranced. Both have intricate shell designs to include buildings, grotto sections and wax figures in silk clothing.
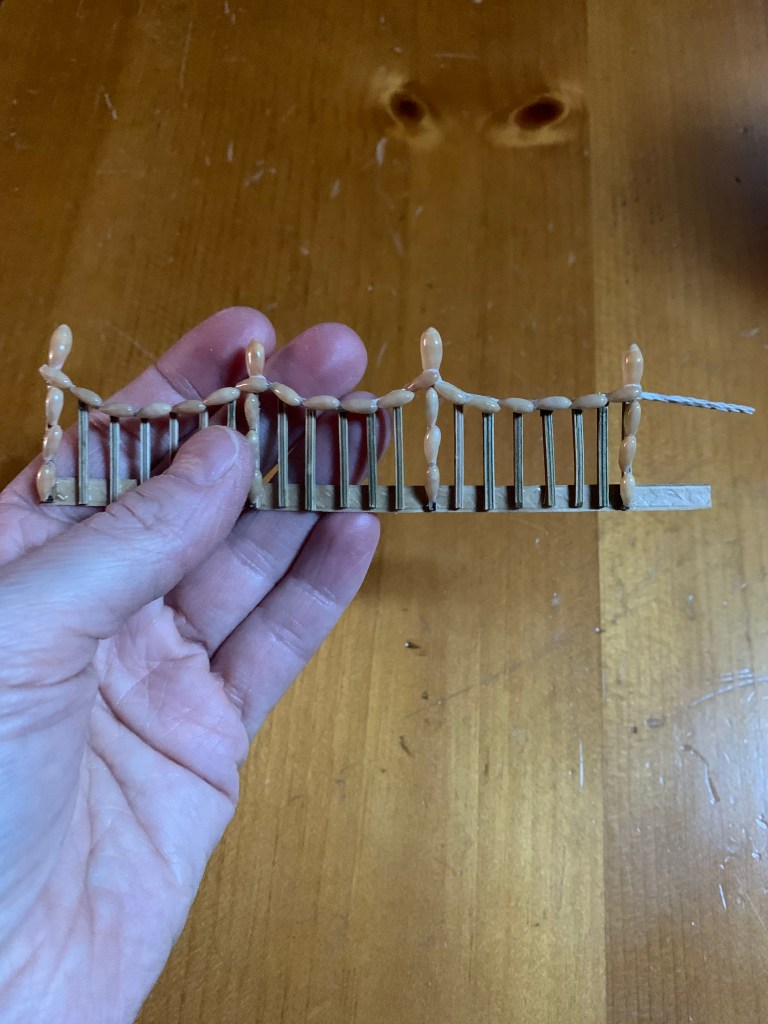
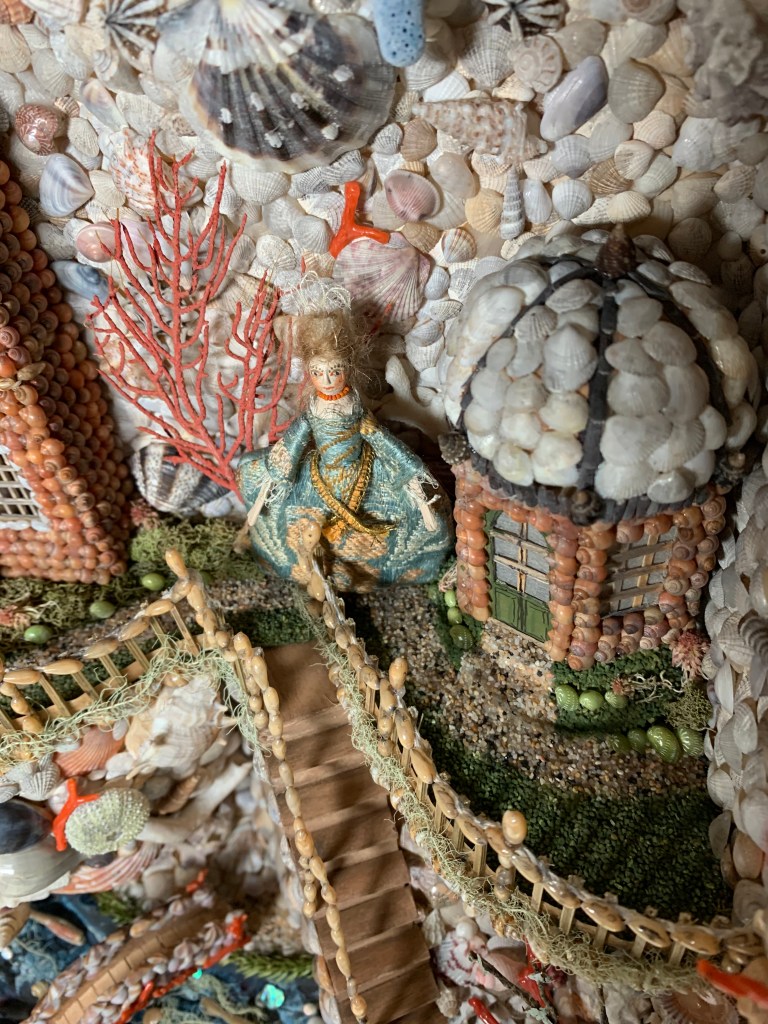
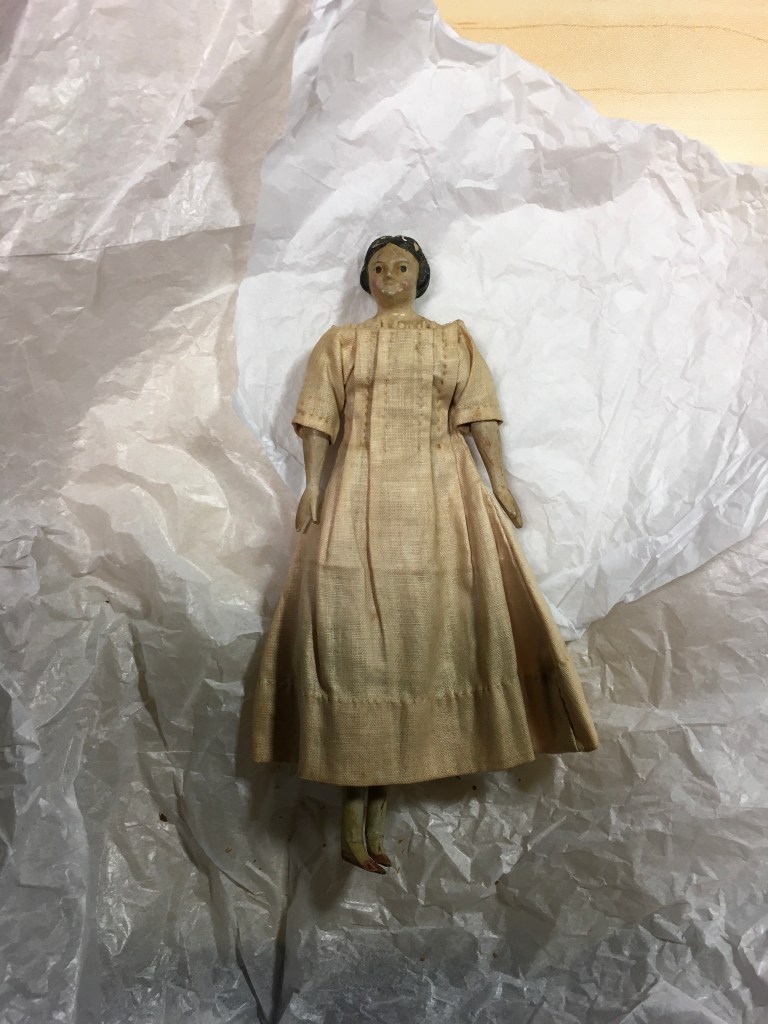
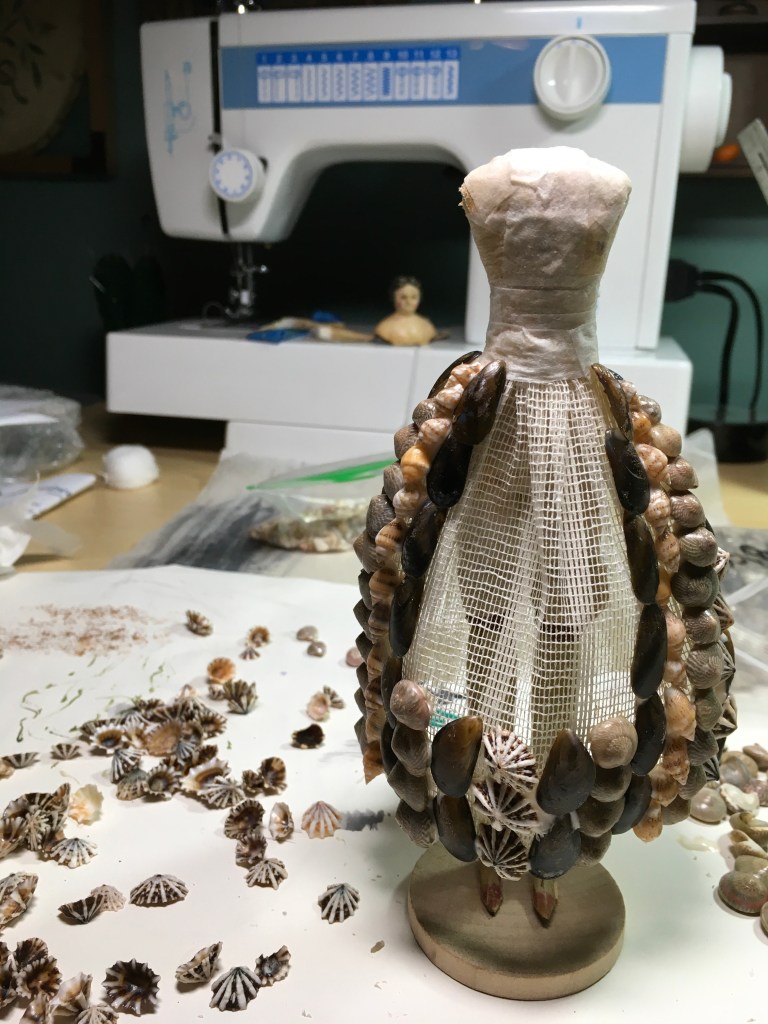
Small dolls that were made for the Coral Bridge box.

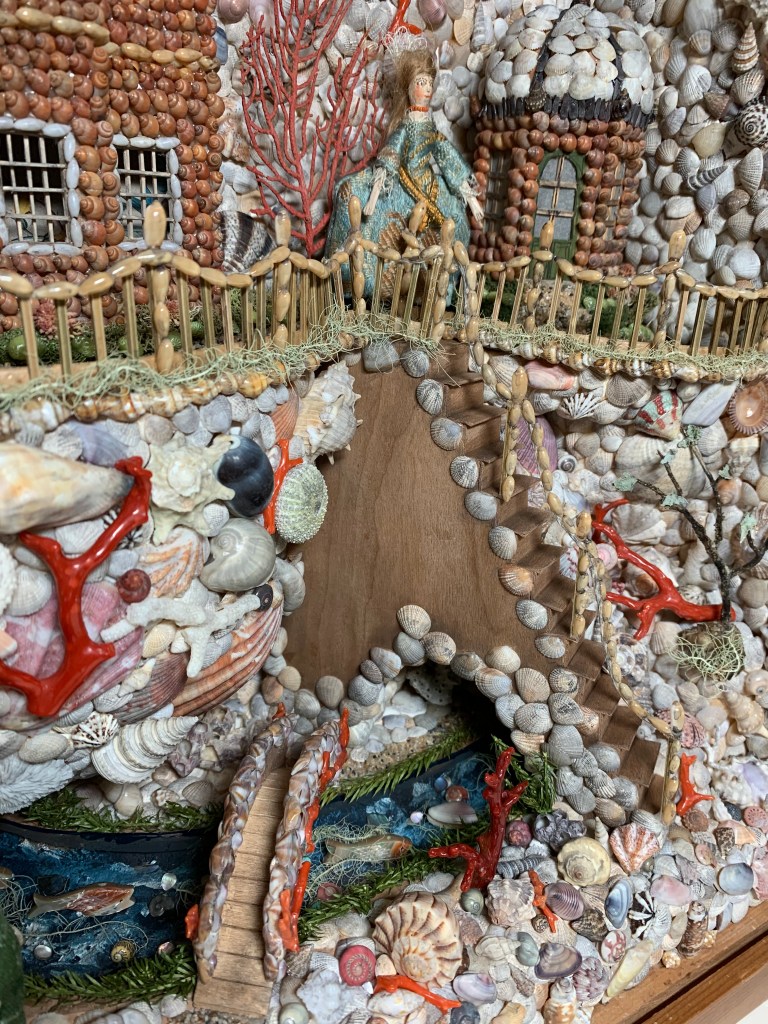
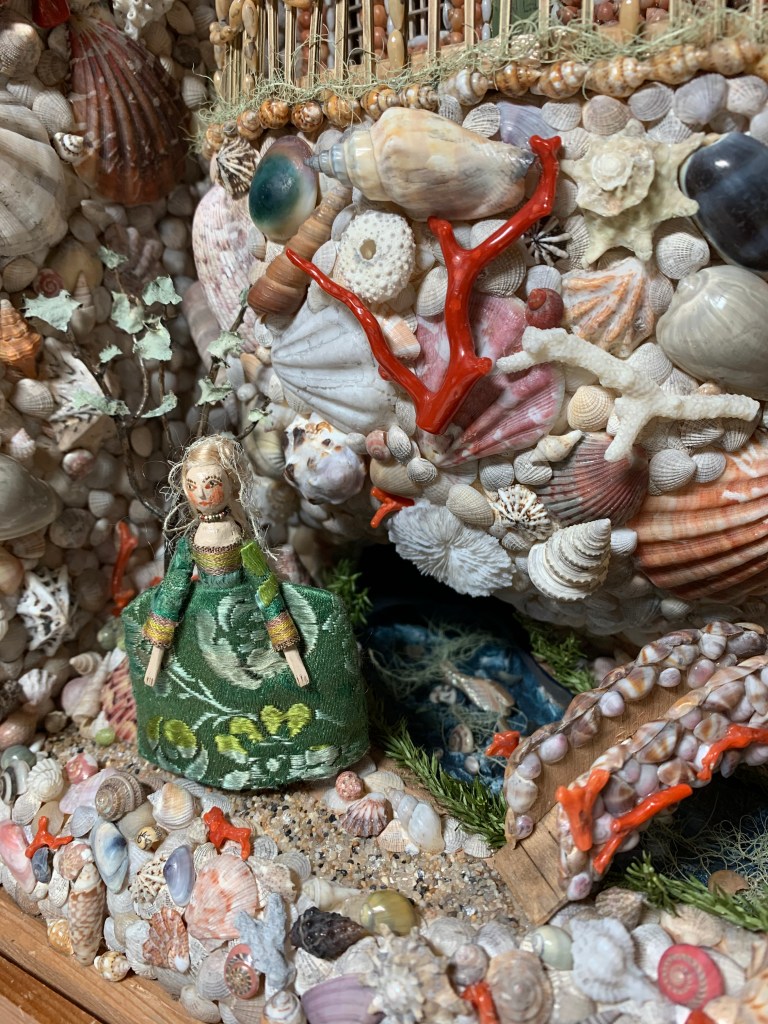
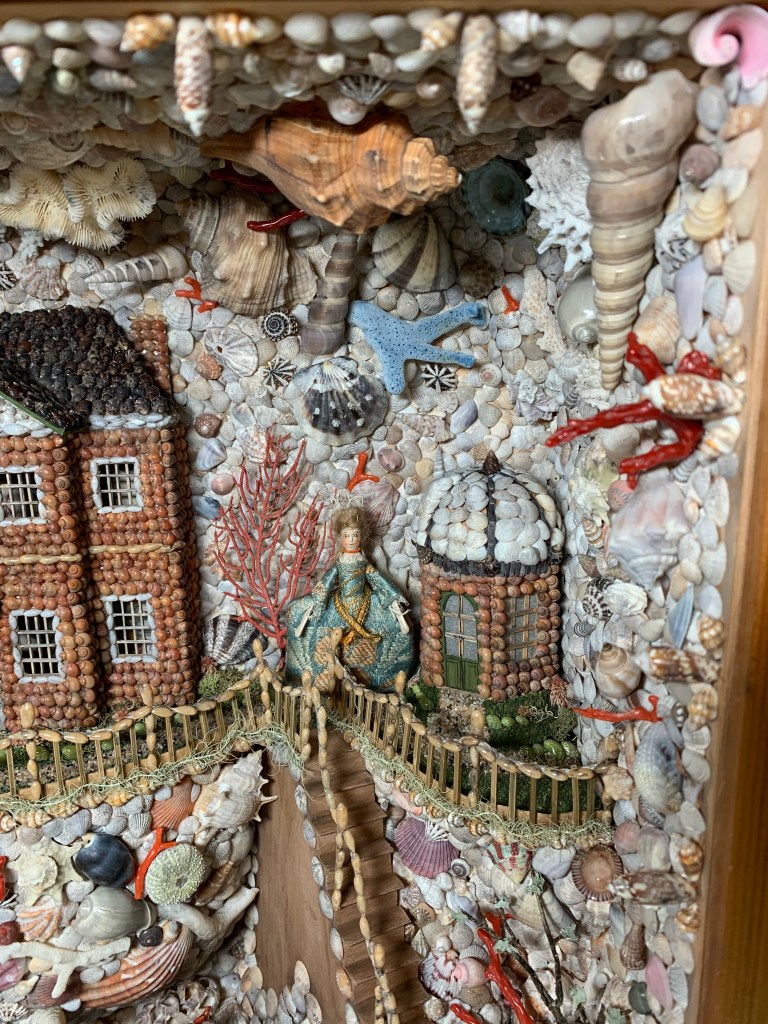
The custom made box has interior measurements of 14 x 12 x 6 inches (smaller than the examples that inspired it). This was started in the fall of 2020 and finished in March of 2021. It features a Georgian styled shell decorated house along with a gazebo/summer house which are elevated to a second level in the scene with a wood/shell stairway down to the lower level. On the lower level is a glass covered waterway that runs between two covered areas. There is a small coral adorned bridge over the waterway. One of the figures is on the top and the other by the bridge below. Some of the boxes are titled and this one is “Look for me at the Coral Bridge”.
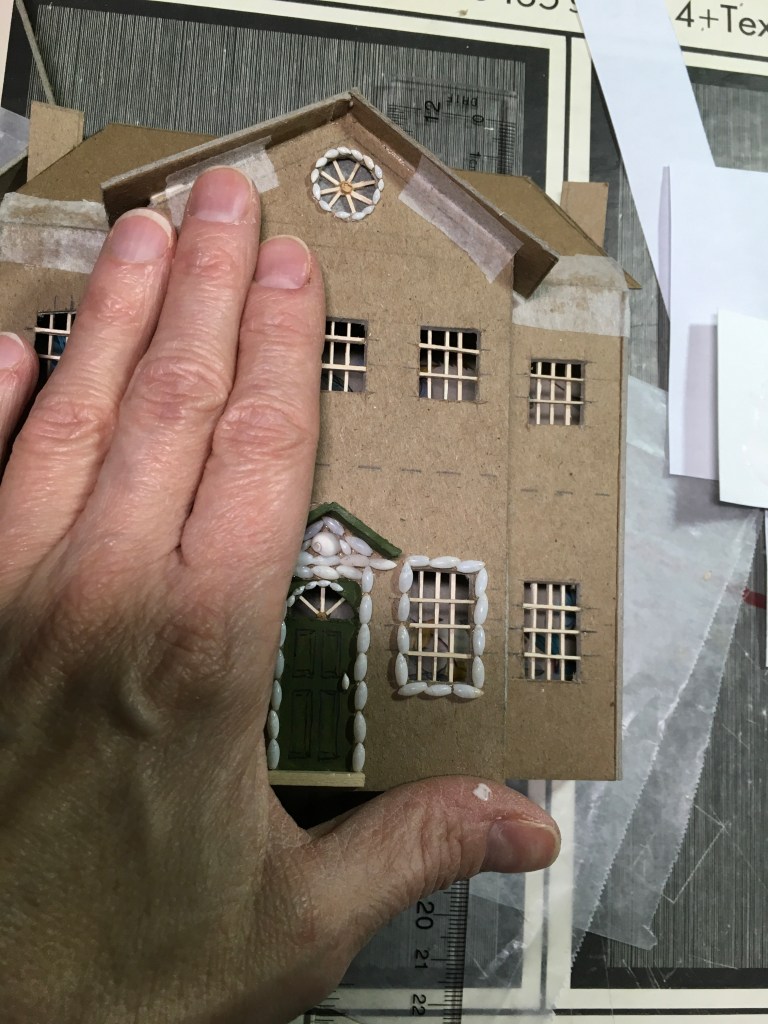
Some details of the interior…


October Garden…

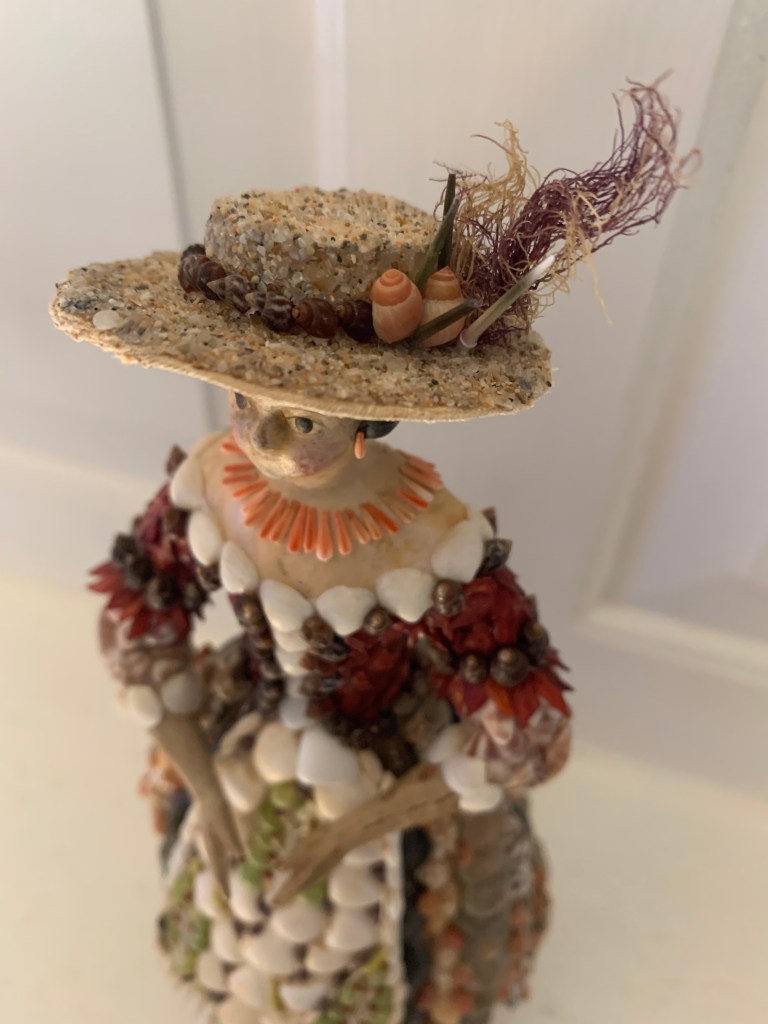
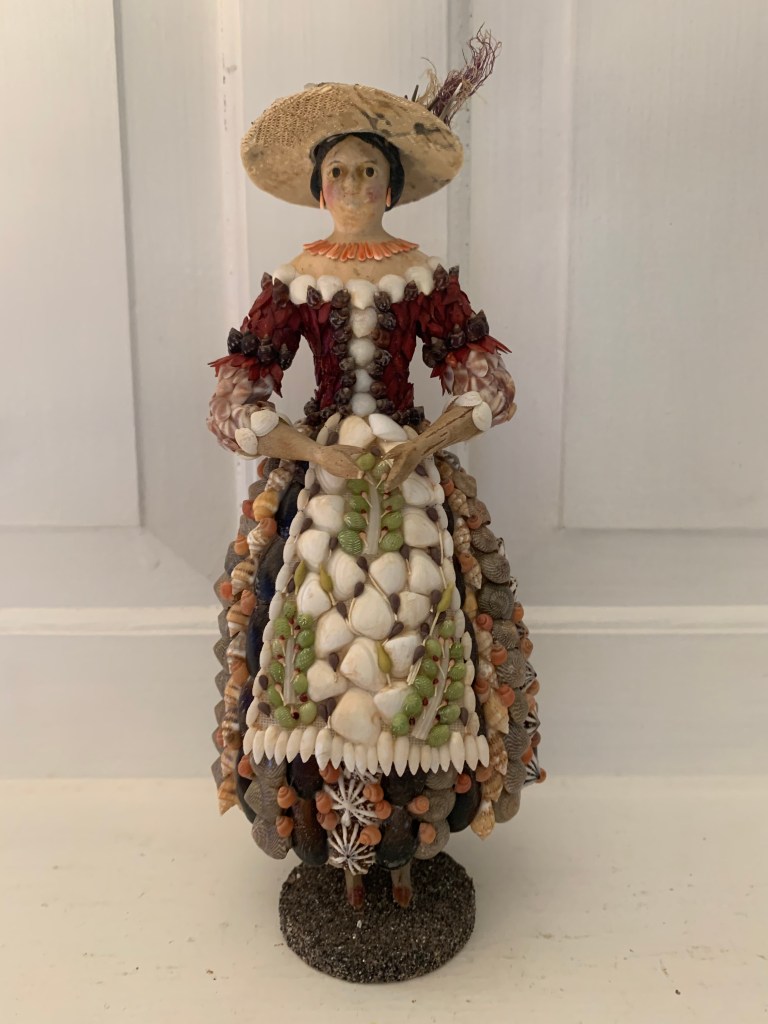
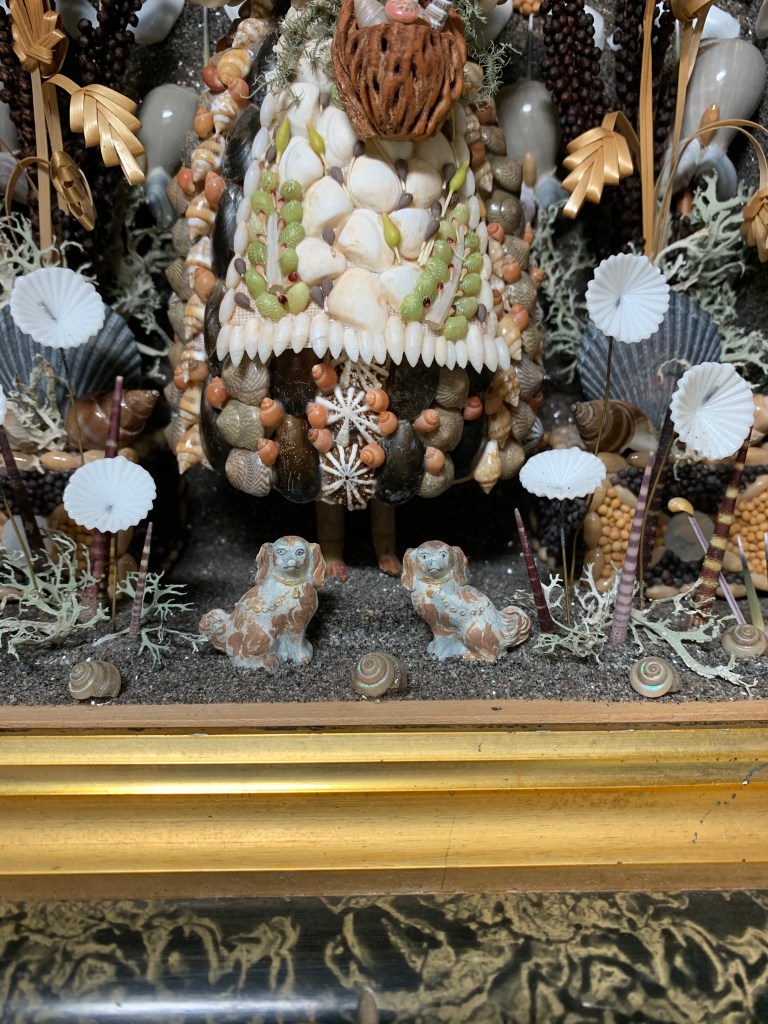
The box was quite an undertaking and incorporates several elements that I love. The doll is a 19th century papier-mache doll that I reworked to represent a French shell doll from the same period. Her hat is made with sand and 18th century silk, accented with shells & seaweed. The dress and apron are all applied shells and she carries a peach pit basket. She is housed in a deep Victorian era box frame that has a garden of shells, fern fronds, dried and glass flowers and urchin spines. There are accents of mustard seed, oak moss, mother of pearl and black walnuts. She also has a pair of hand painted spaniels. The total measurement is 14 x 16 inches. This one is titled “October Garden”.
Reworking the doll to make a shell figure.
Some interior views along the way.


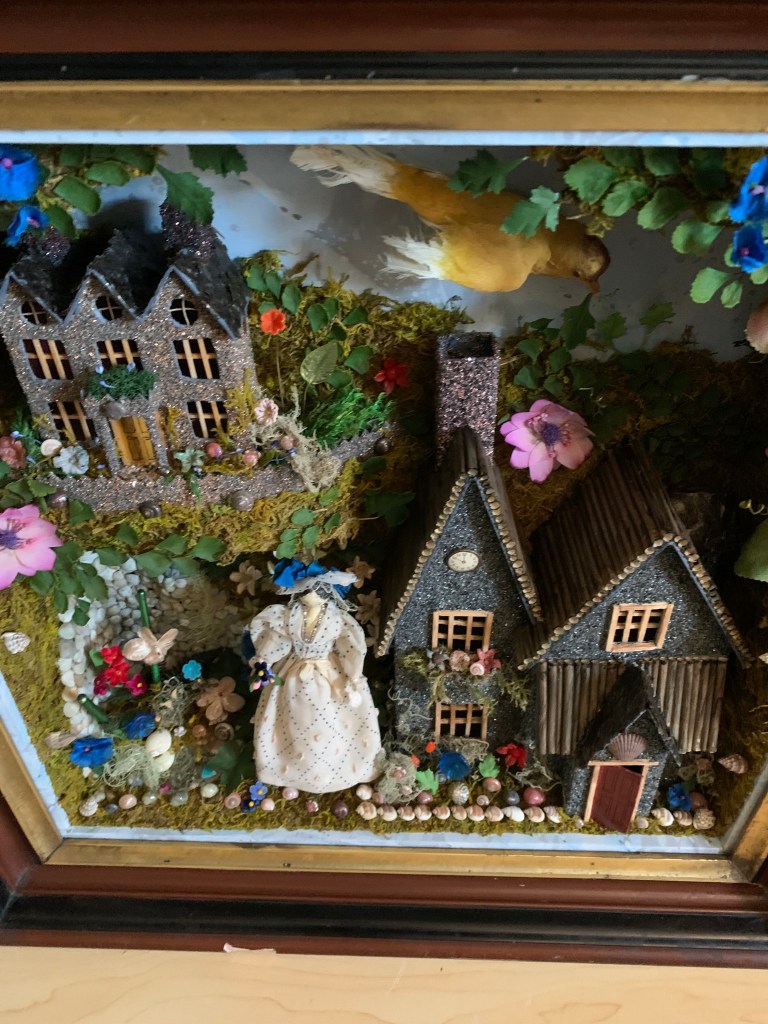
10am Garden Walk…

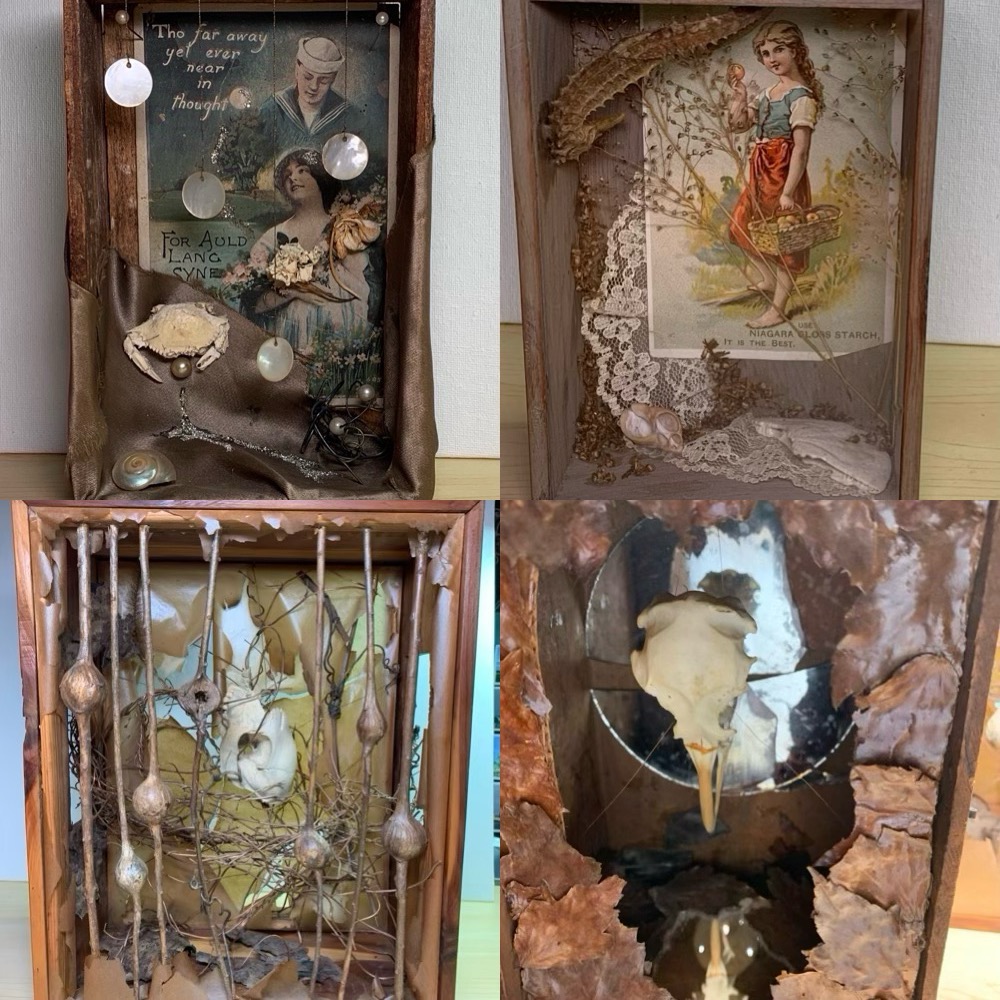
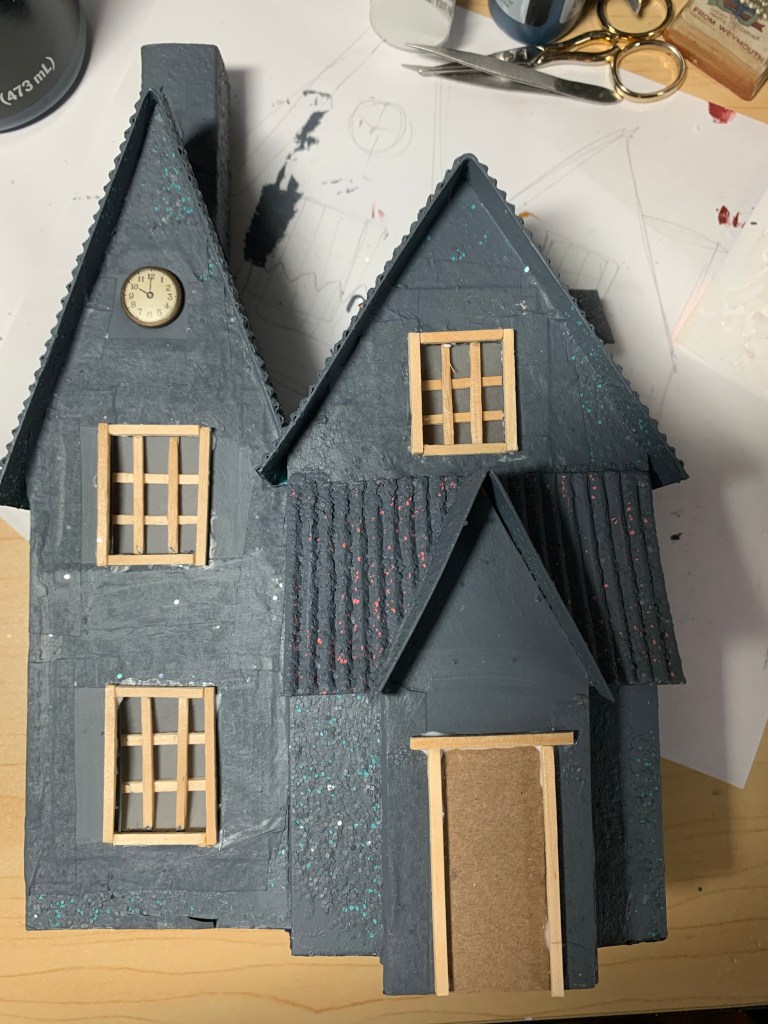
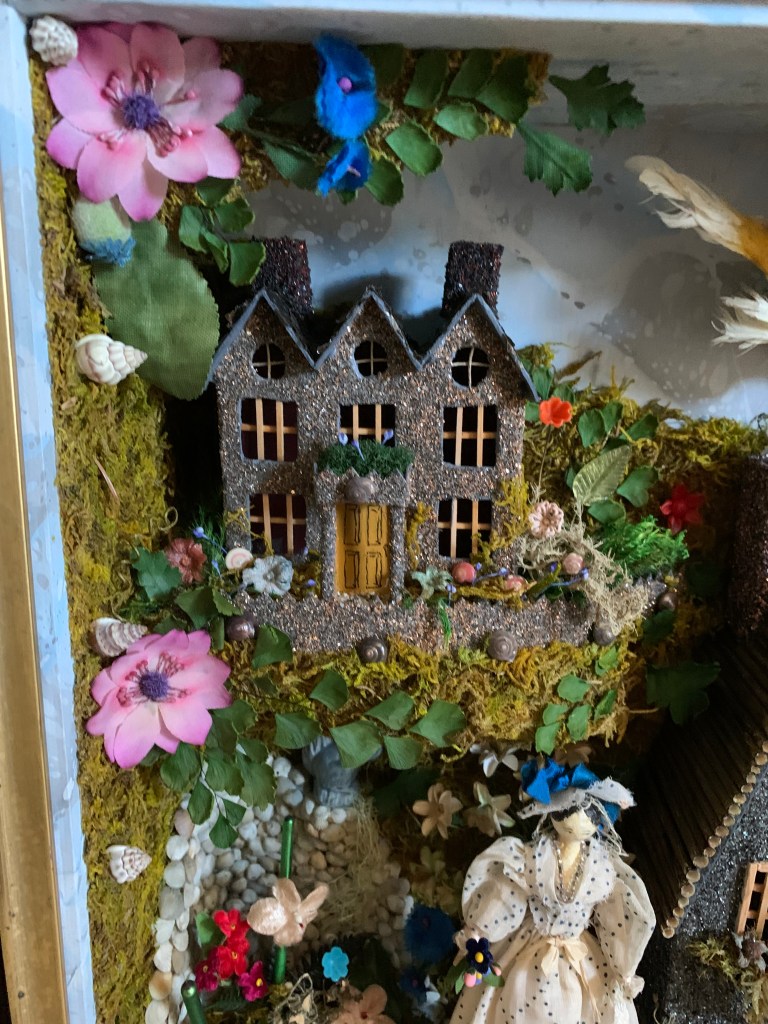
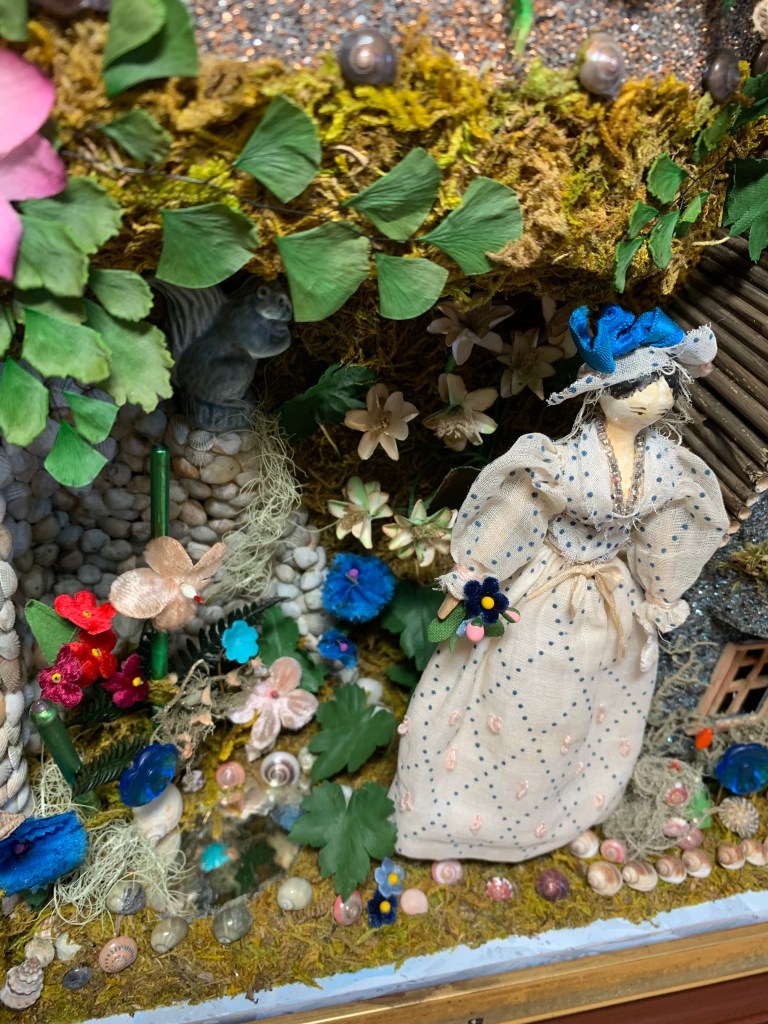
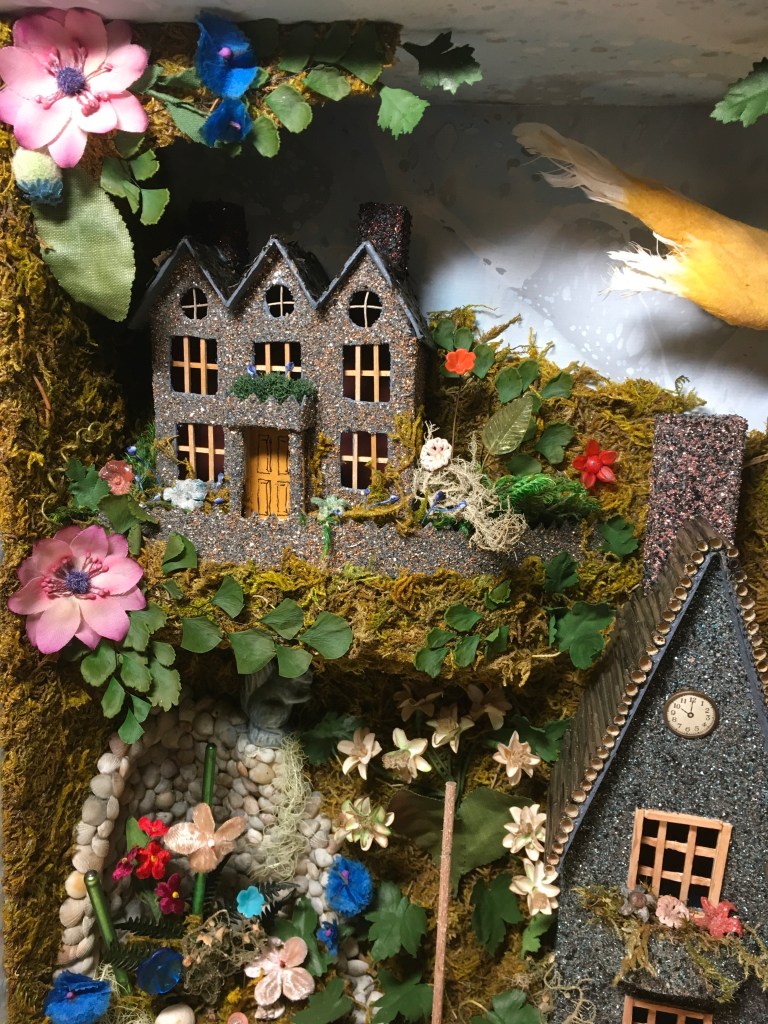
This one was lots of fun. I was outbid on an antique box with similar elements. It had a real bird that was sort of tattered and a couple of antique wooden dolls along with some houses decorated with glitter. There was lots of moss and small animals throughout. Someone gave me this nice 18 inch square antique frame, but I had to build the box portion out to make it deeper. The original had items all out of scale and I liked it a lot. My version has an antique wooden doll in a garden world that consists of two levels with structures; a mirror pond, a squirrel, and also a large (not real) out of scale bird. There are many different types of genuine and faux plants and flowers throughout the garden. Because it’s new, the colors are much brighter and more cheerful than the old version I liked, so in some ways I’m glad I was outbid.
Some views in the making.

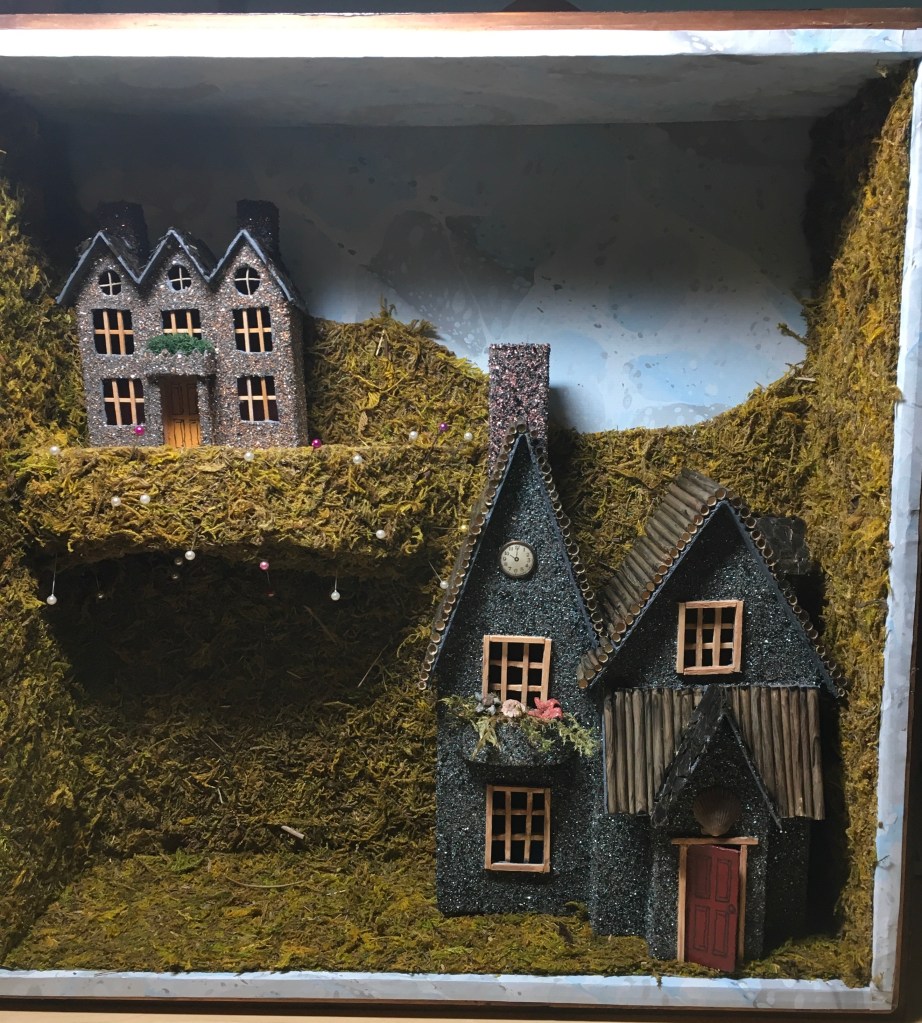
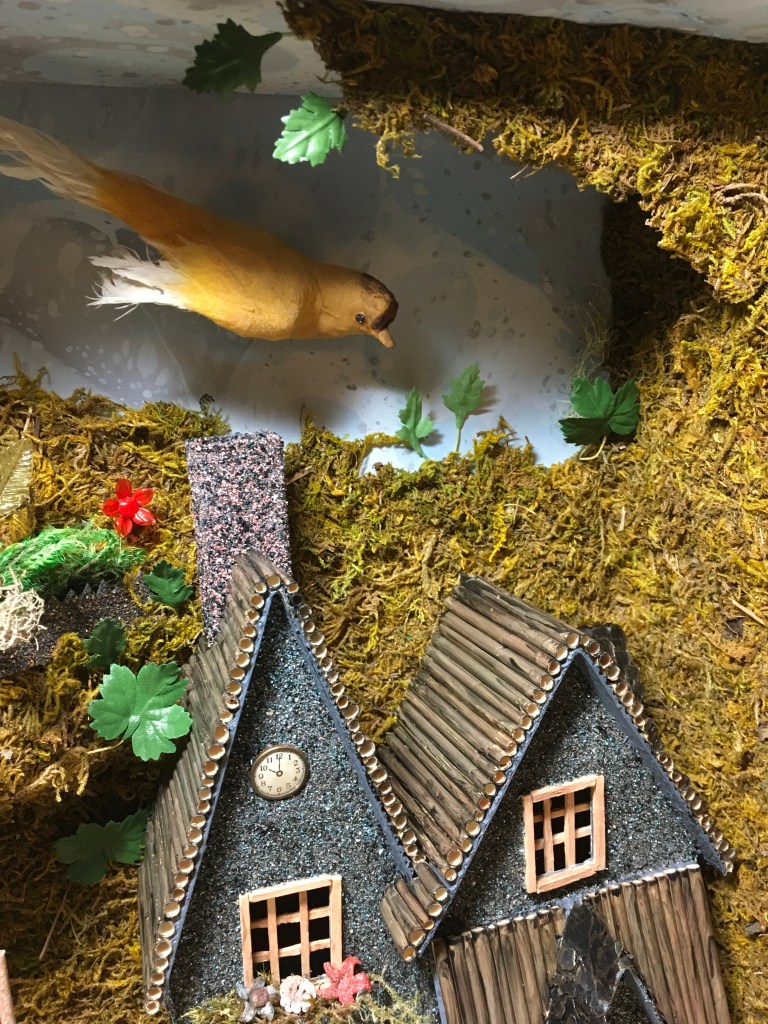
More interior views.

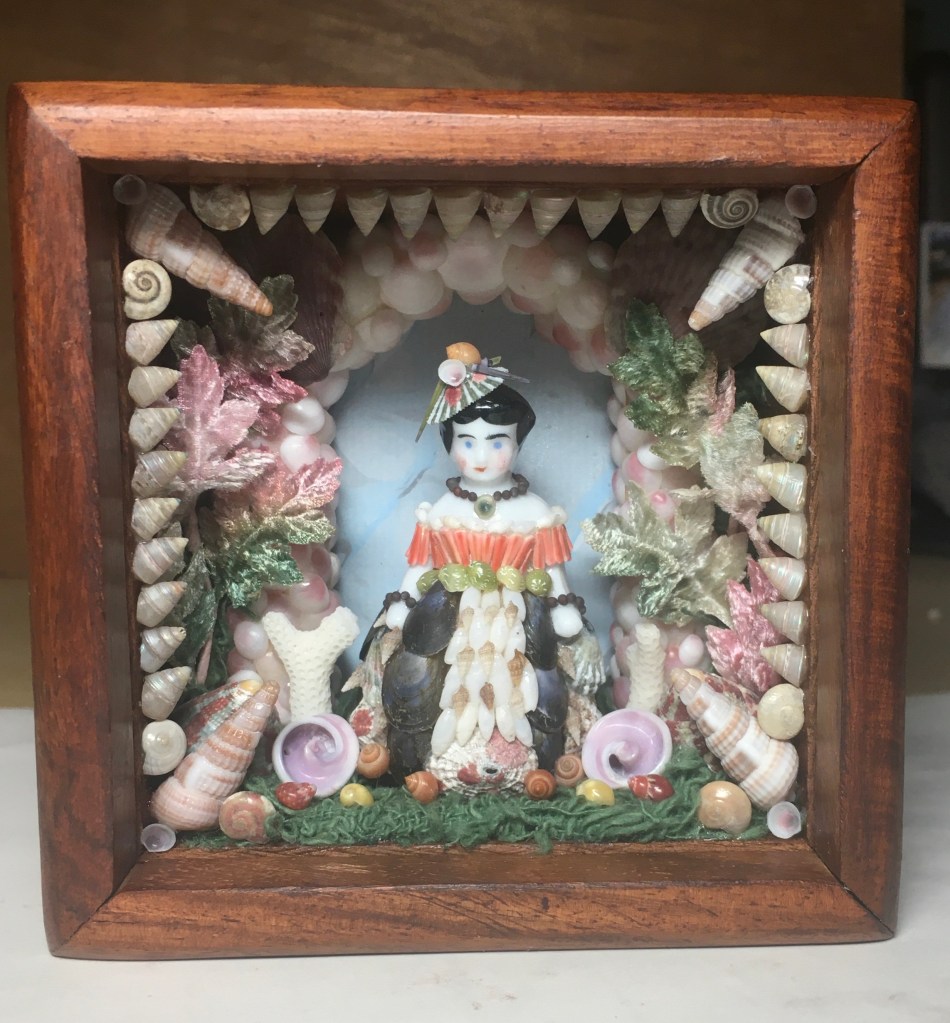
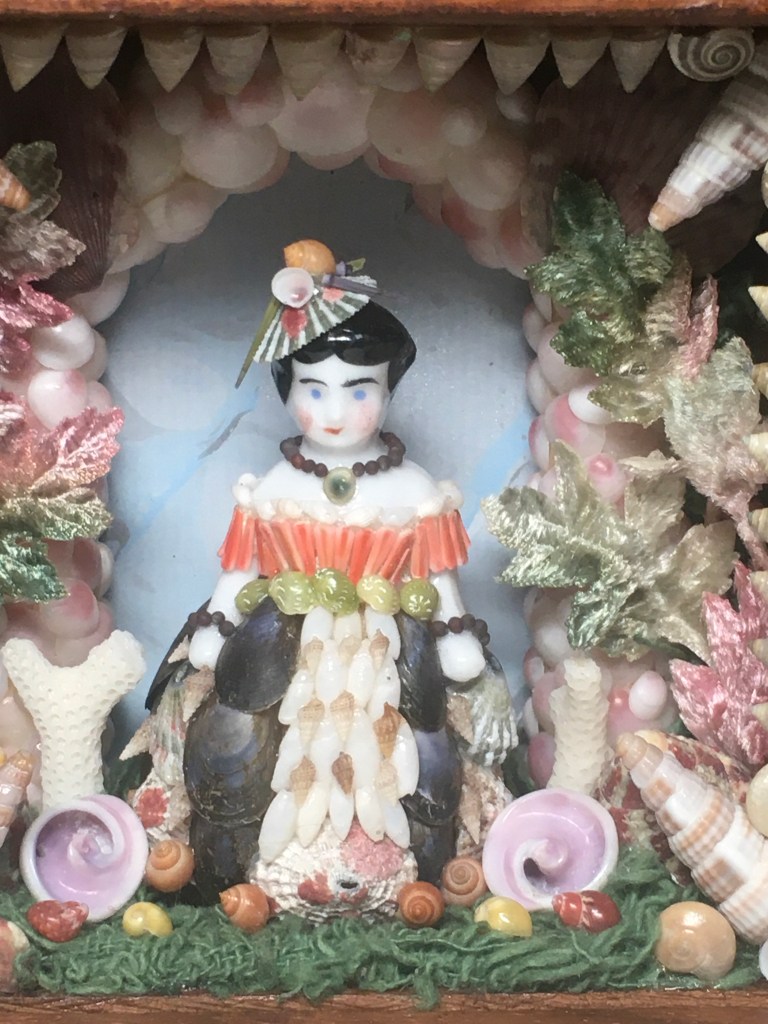
Shell Frozen Charlotte Scene…
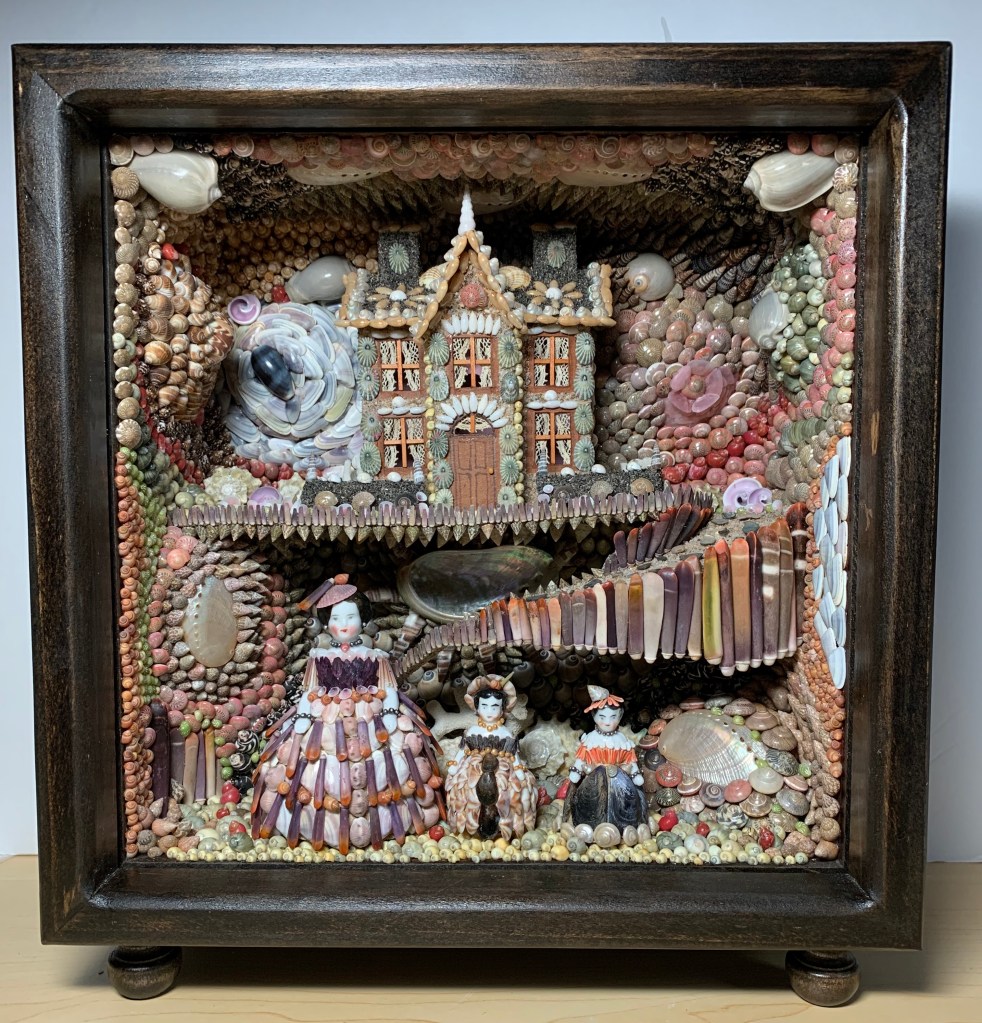
This shell scene box features 3 antique porcelain frozen Charlotte dolls that I have “dressed in shells”. The custom box is stained dark walnut with an interior size of 10x10x4 inches, and has a glass front that slides in…can’t have dust in these shell boxes! I added feet to the box for a more antique feel. The house and landscape are all comprised of various shell forms. In some ways it was more challenging than the Coral Bridge box since the shells in that one were more random and these followed some patterns even though they were free form. It was a lot of fun and is a companion to the next box featured.
Some views in the making.


Some interior views.


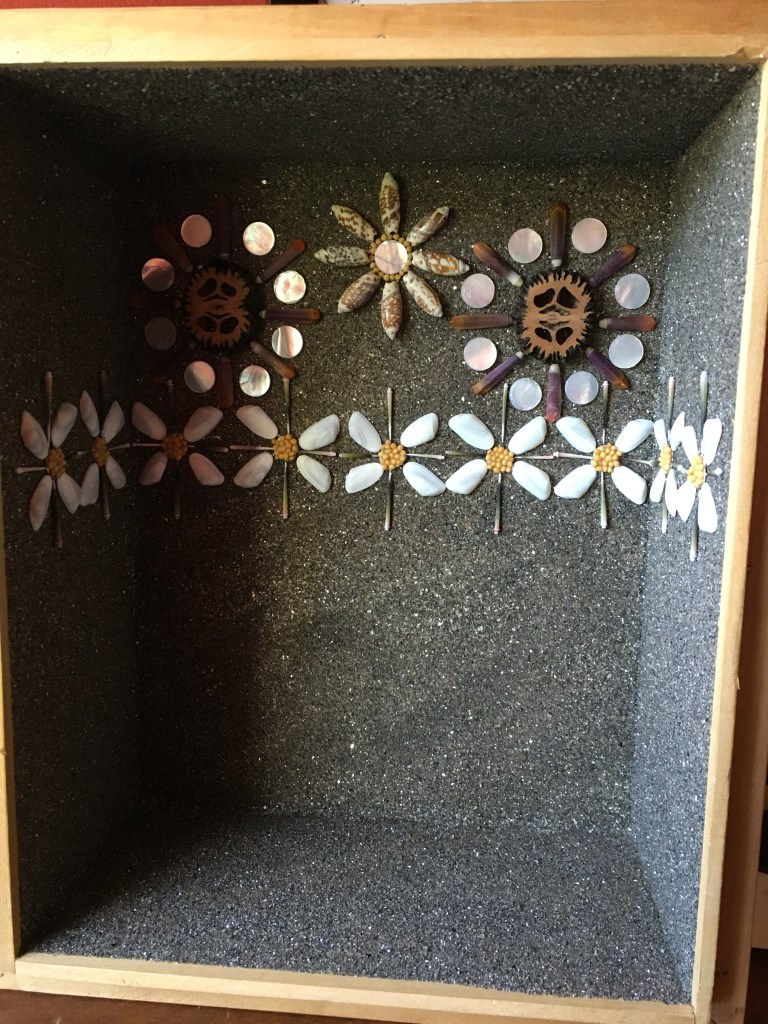
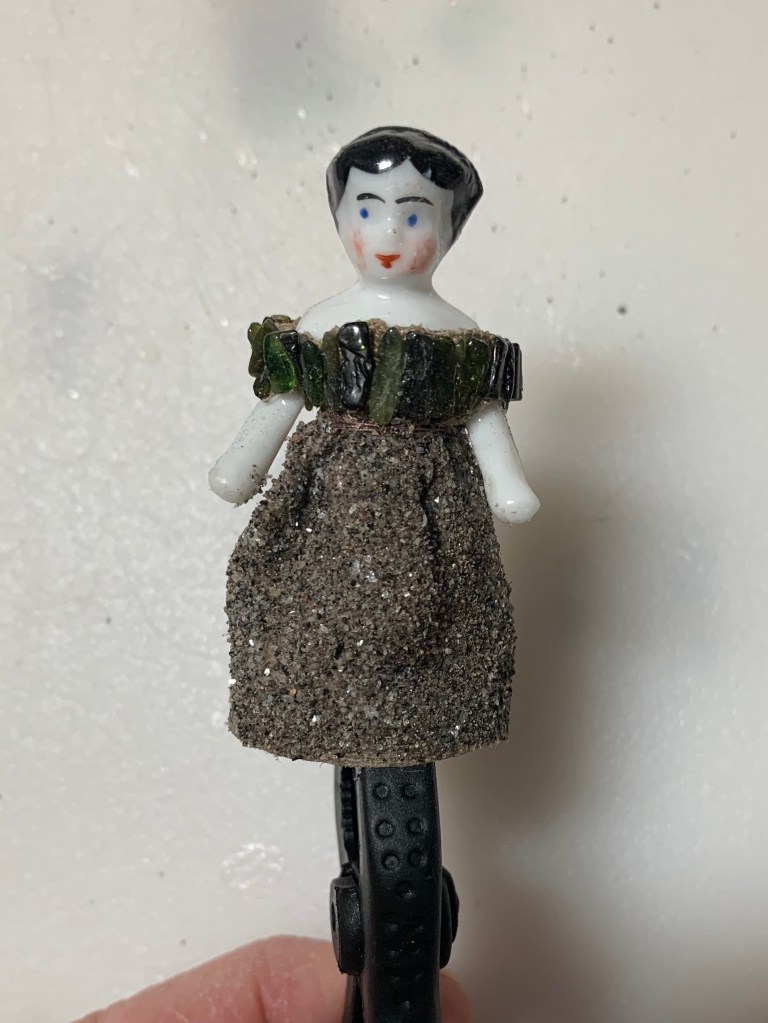
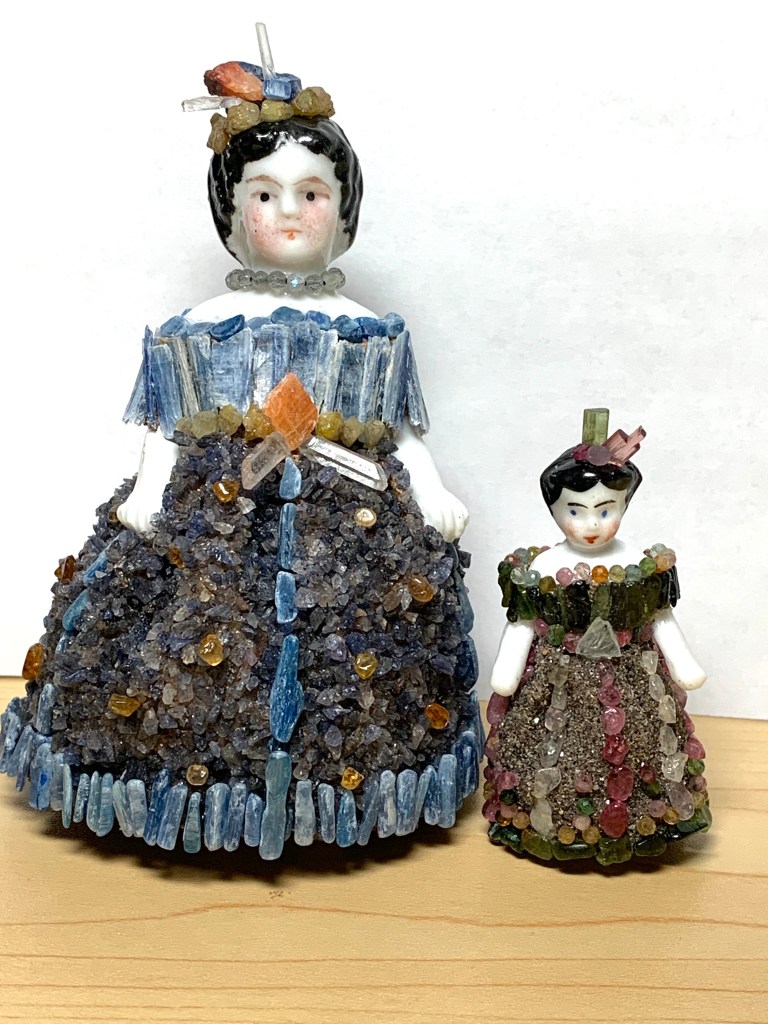
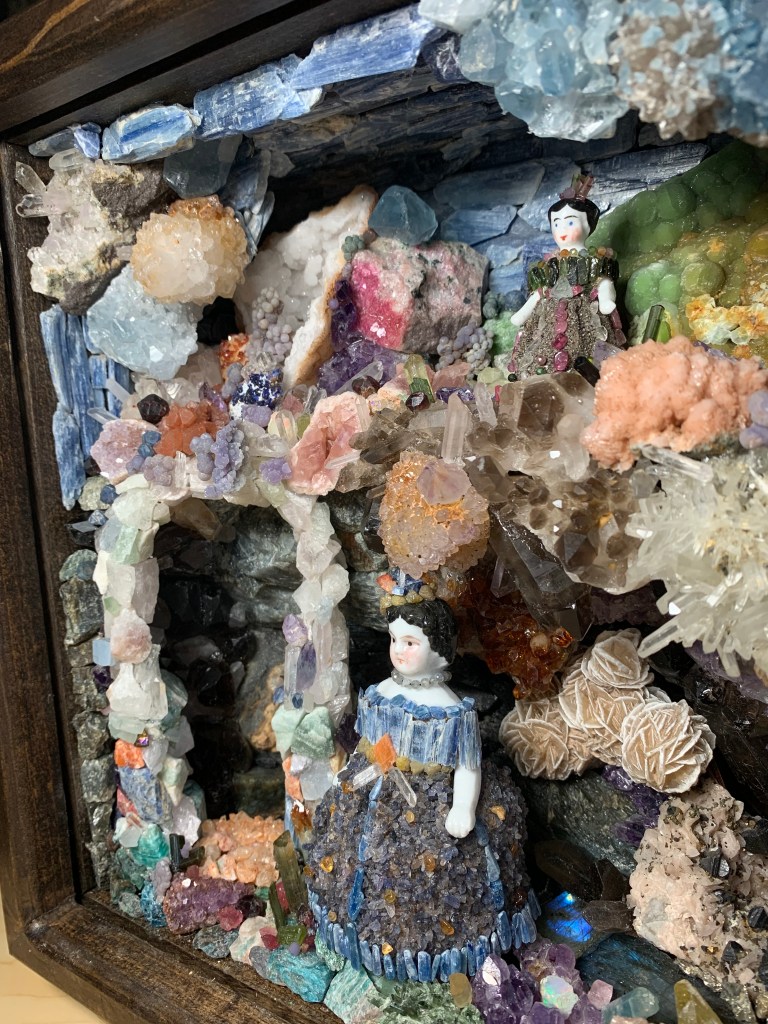
Mineral & Gem Frozen Charlotte Scene…
This is the companion piece to the shell shadowbox. It also incorporates antique Frozen Charlotte dolls incased in a crystal world with clothing made to correspond with their environment. There were times when I thought I bit off more than I could chew with this crystal/ mineral box. Knowing the rocks would be heavy, I used wire mesh and lightweight wood reinforcements in an attempt to keep the weight down…it didn’t work. This box is really heavy! It was fun placing the flashy stones like Labradorite and opal where they will catch light. I’ve had many of these minerals since the 80s. They’ve been packed away, and then I got this idea to use them. The interior measurements are 10x10x4 inches.
Some views in the making.


Some interior views.
The two boxes together…

Tiny Shell Charlotte Box…
At just 3 3/4 “tall, this box frame is about the smallest I’ve done…a handheld version. The antique frozen Charlotte is 2.25 inches and is decorated with tiny shells – mussels, limpets, urchins, and others. Her bracelets and the necklace are mustard seeds with a small operculum pendant. The box has a glass front and is decorated with marbled paper, shells, coral, vintage millinery leaves and trim. This one doesn’t take up much space!
Some views in the making.


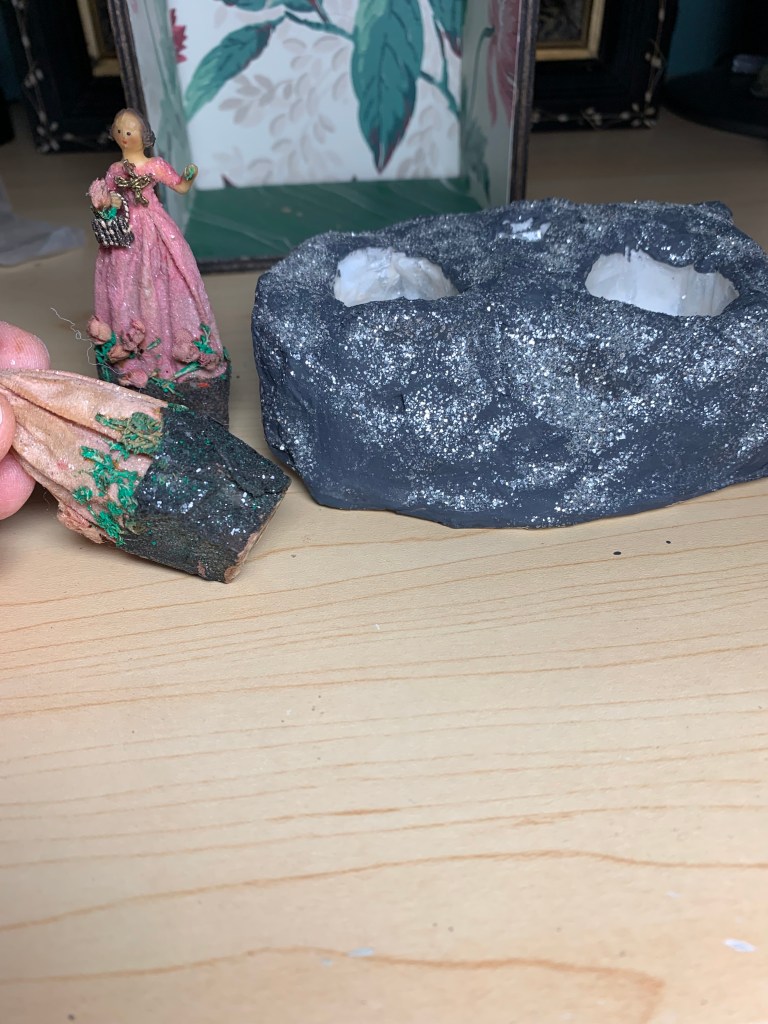
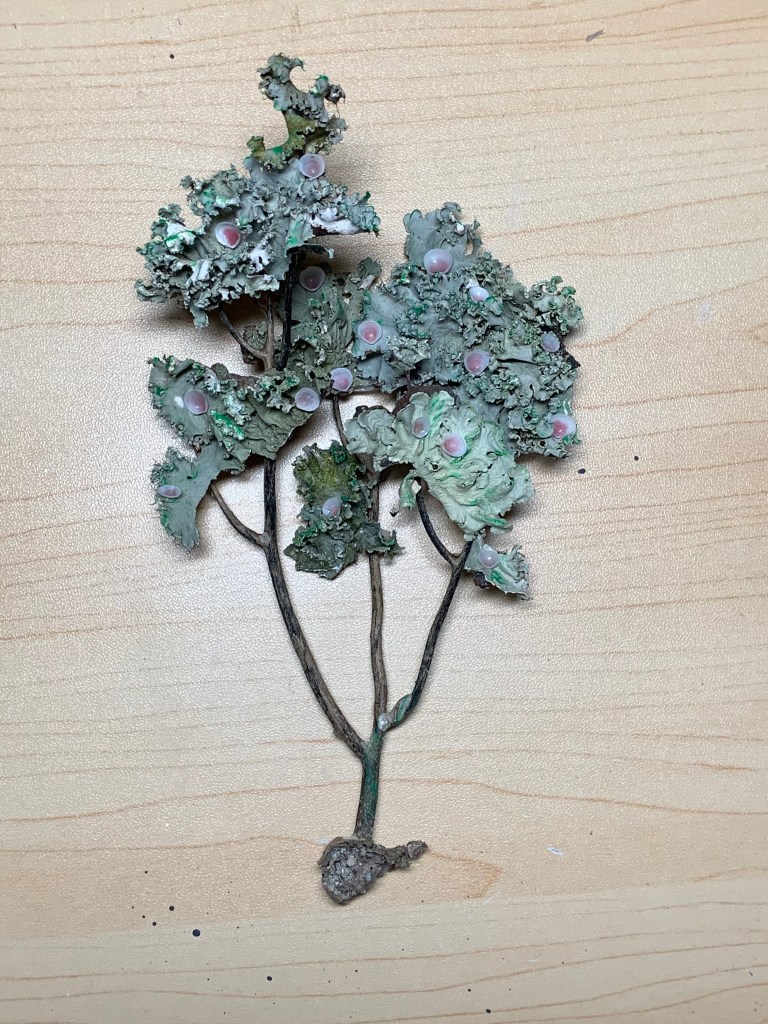
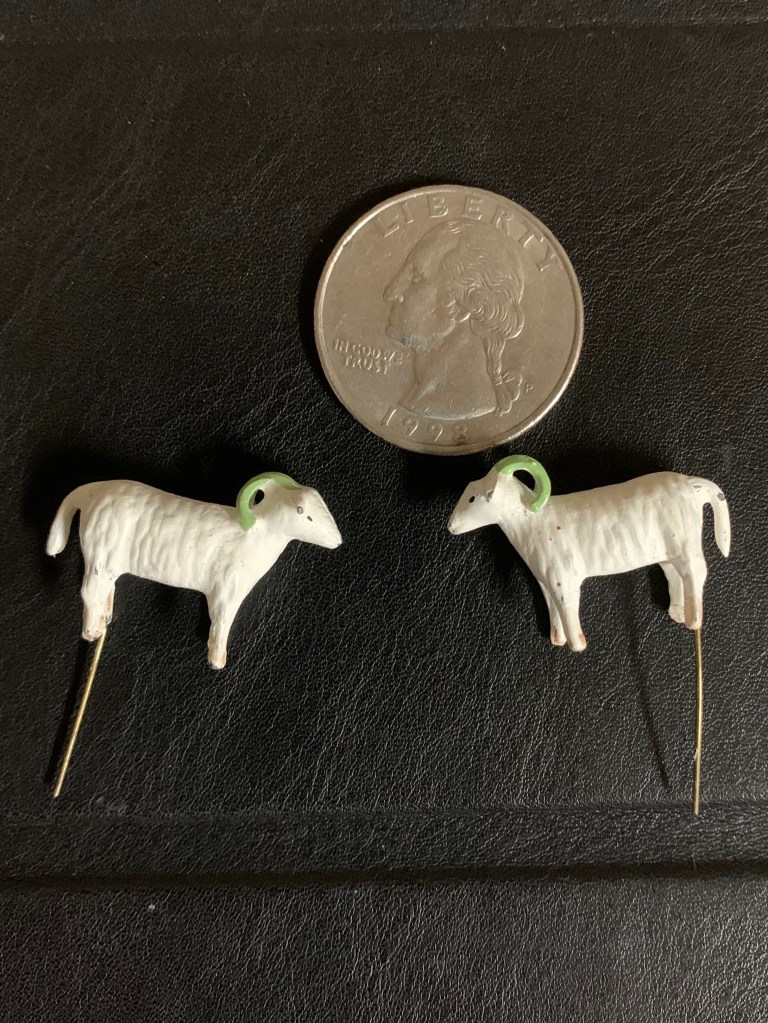
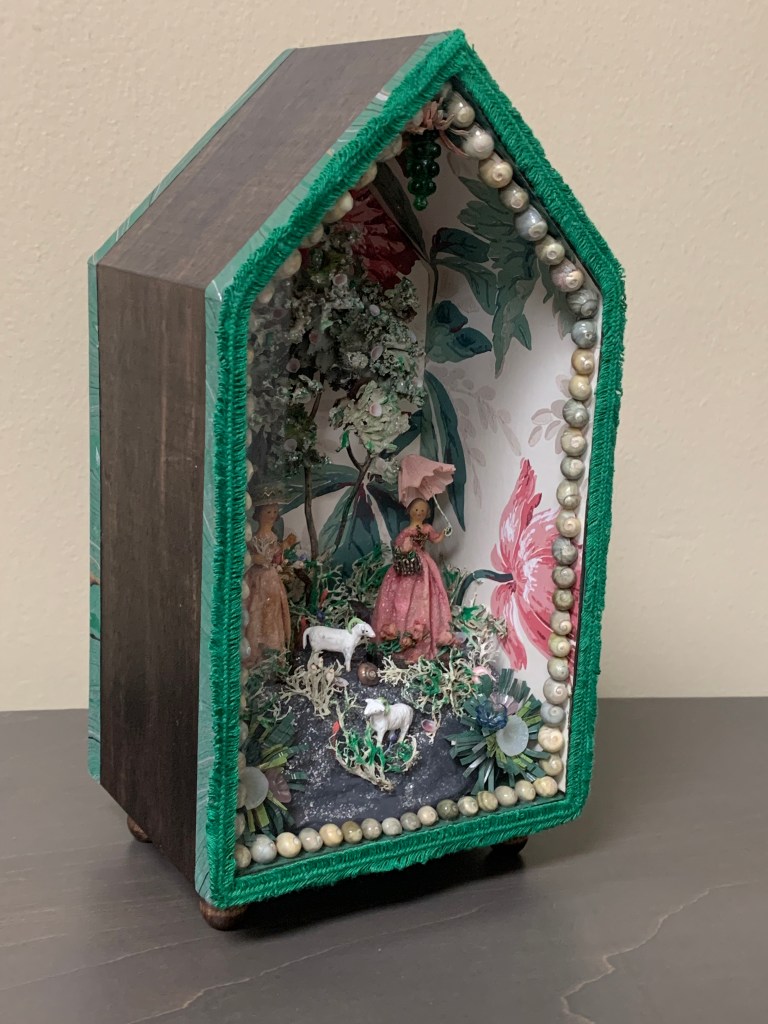
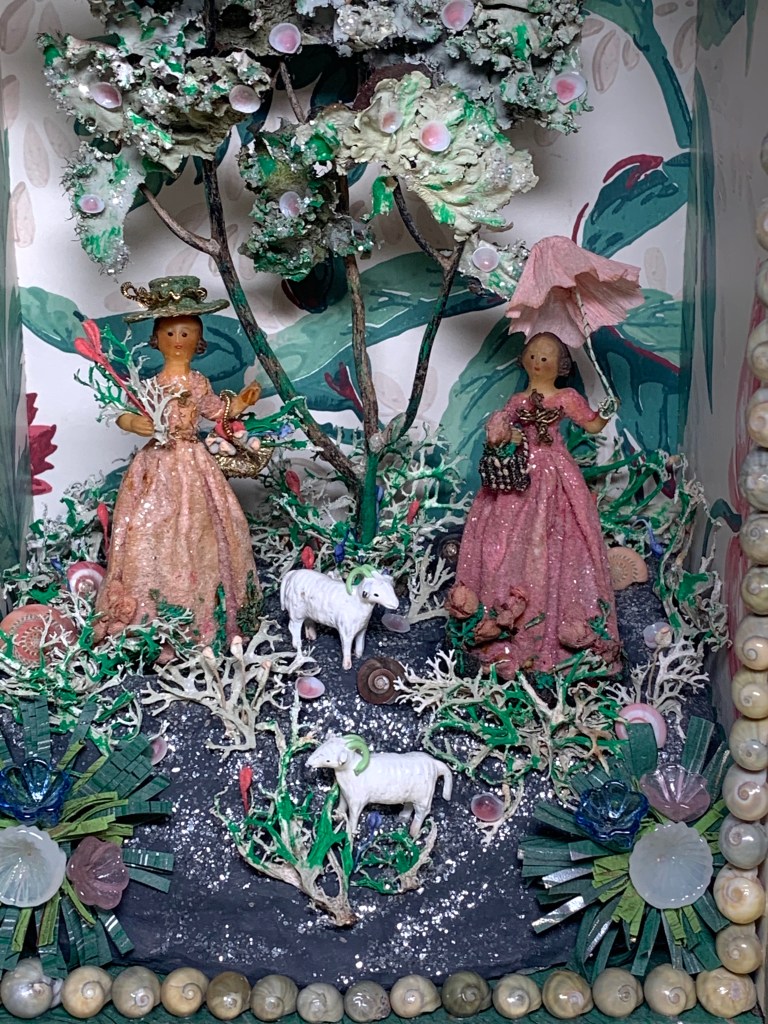
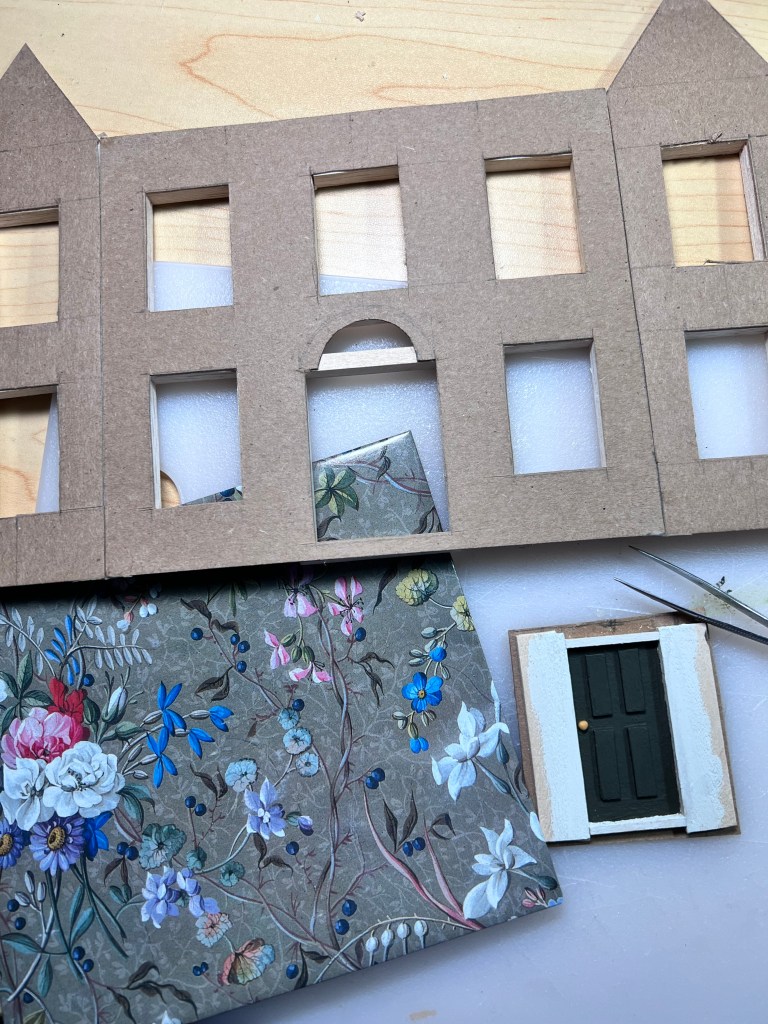
A World for Tiny Wax Figures…
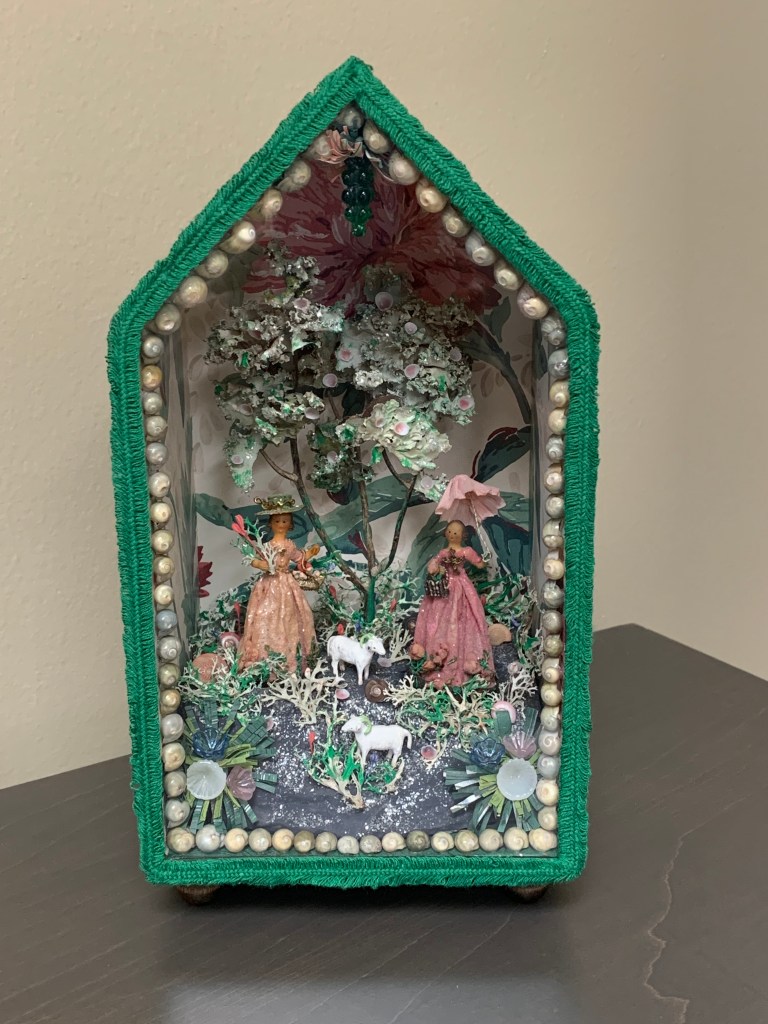
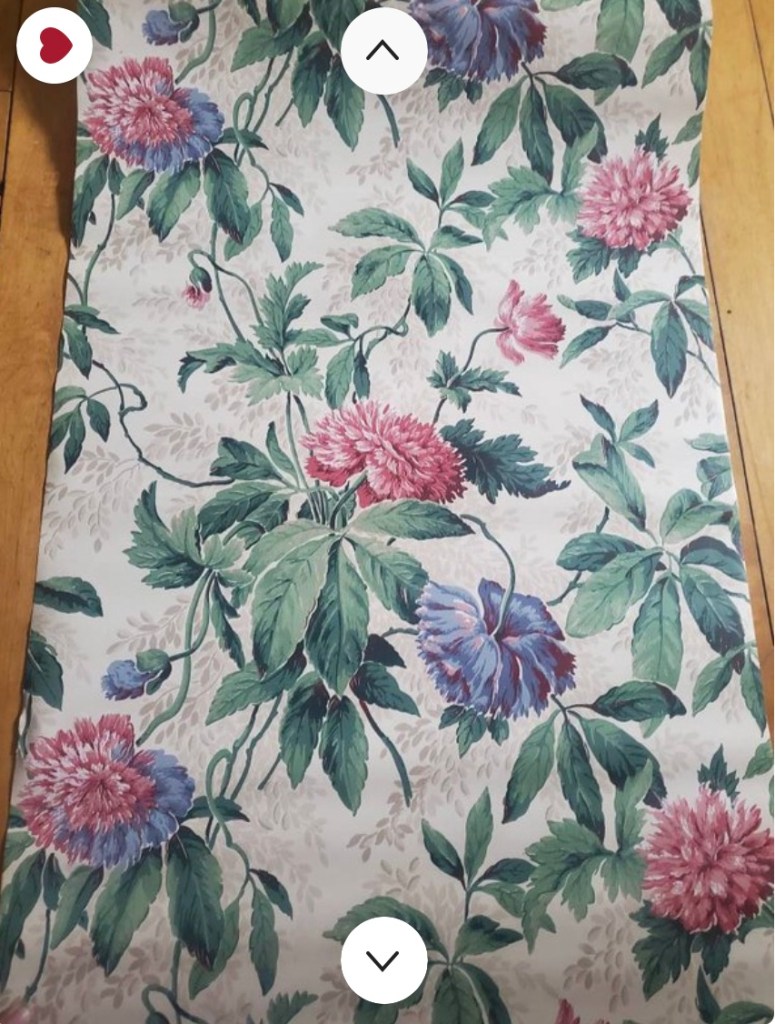
I found these great tiny wax and paper figures dating to the mid 1800’s. They were so special and were part of something originally but I decided they would be perfect for a diorama scene. For these I used an inexpensive wood open gable frame. I added a back and feet and had a glass cut for the front. A base was made to match the original base on the figures. They were given some accessories such as a parasol and basket since things were missing. The box was decorated with vintage wallpaper and various mosses, shells, sea whips, glass and paper flowers and I found the most perfect metal sheep for the scene. Total height is 11 inches, and every time I look at this I marvel at the little was figures that somehow survived in amazing condition.
Some views in the making.


Some interior views.

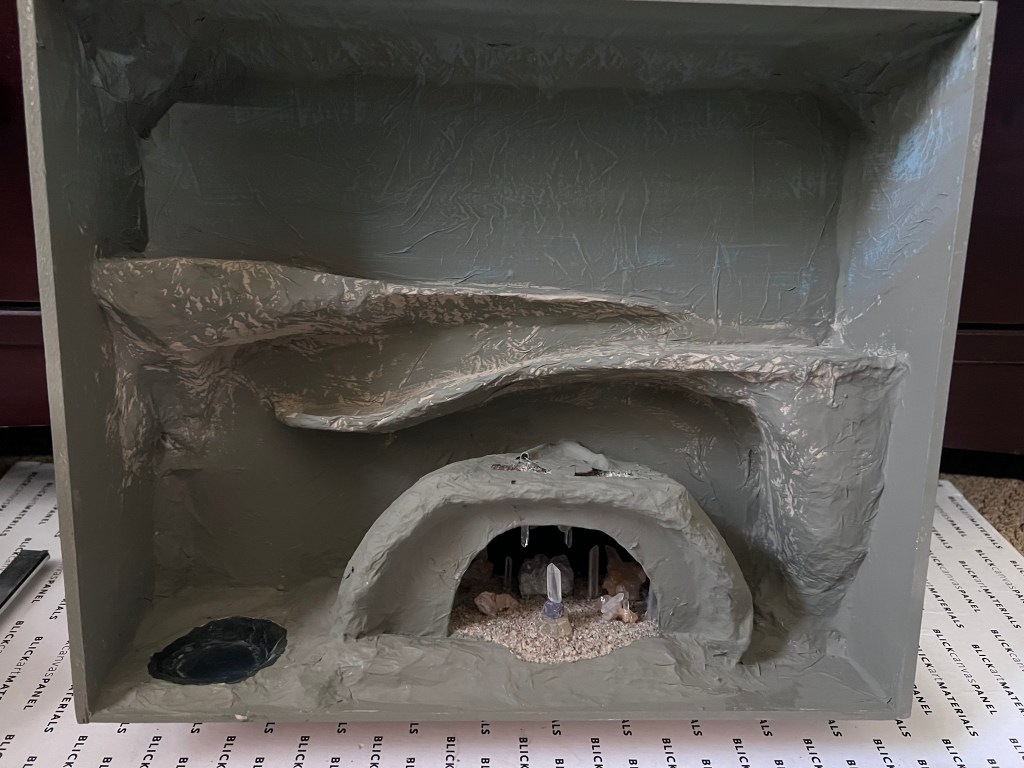
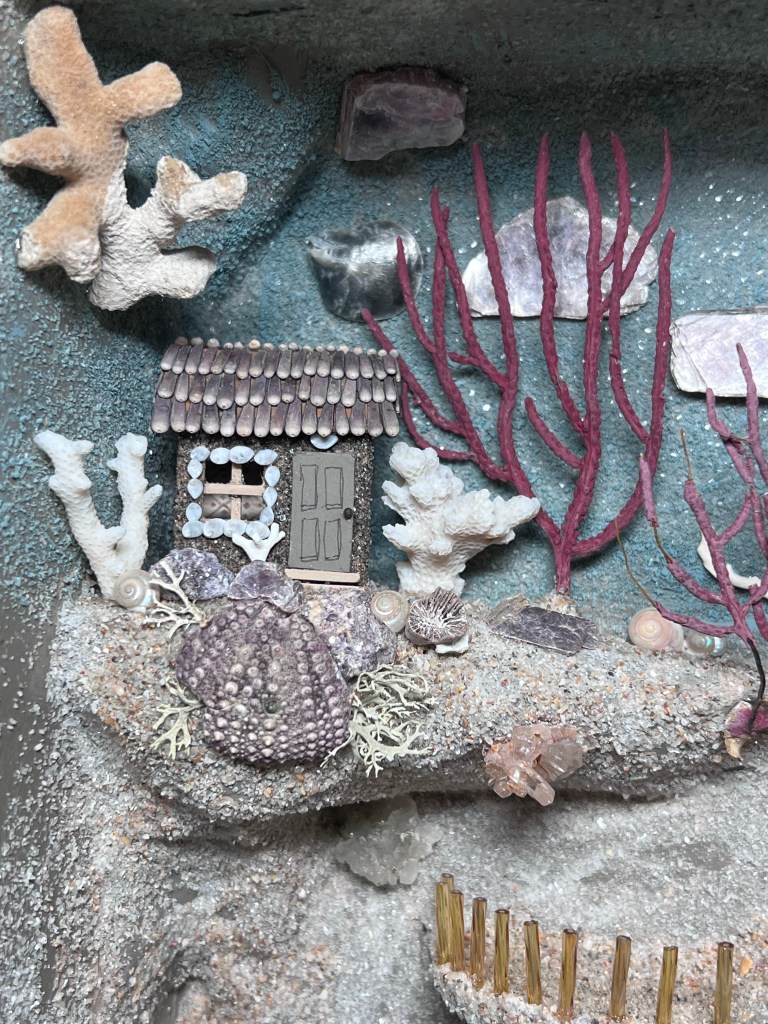
Grotto Diorama…

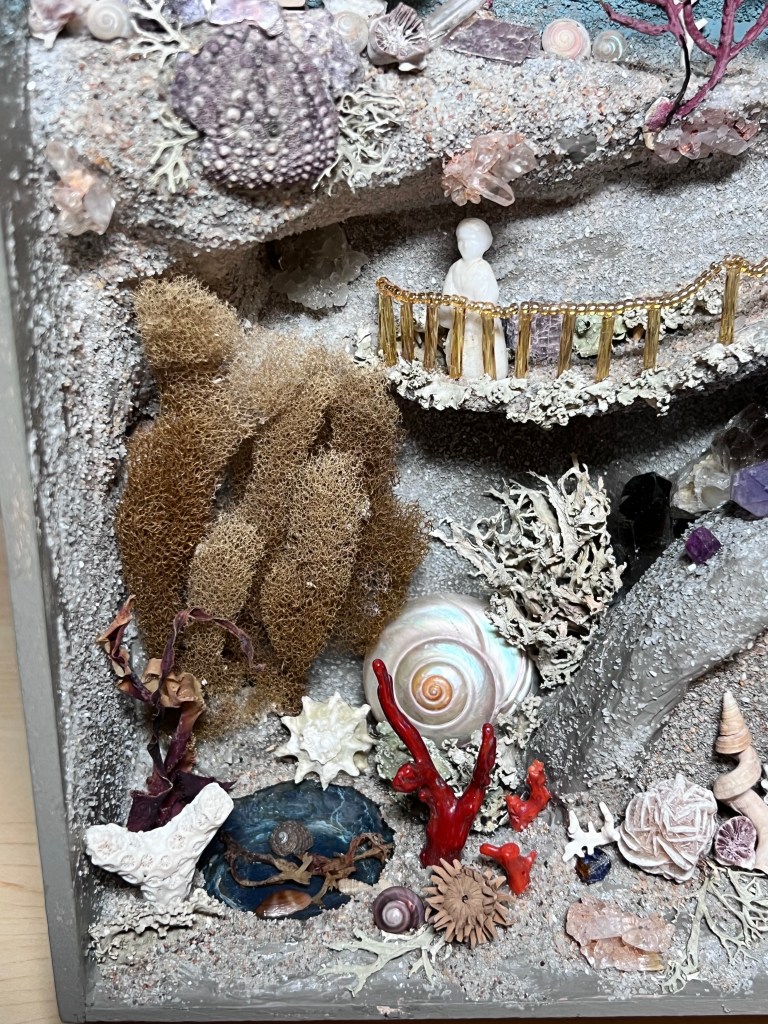
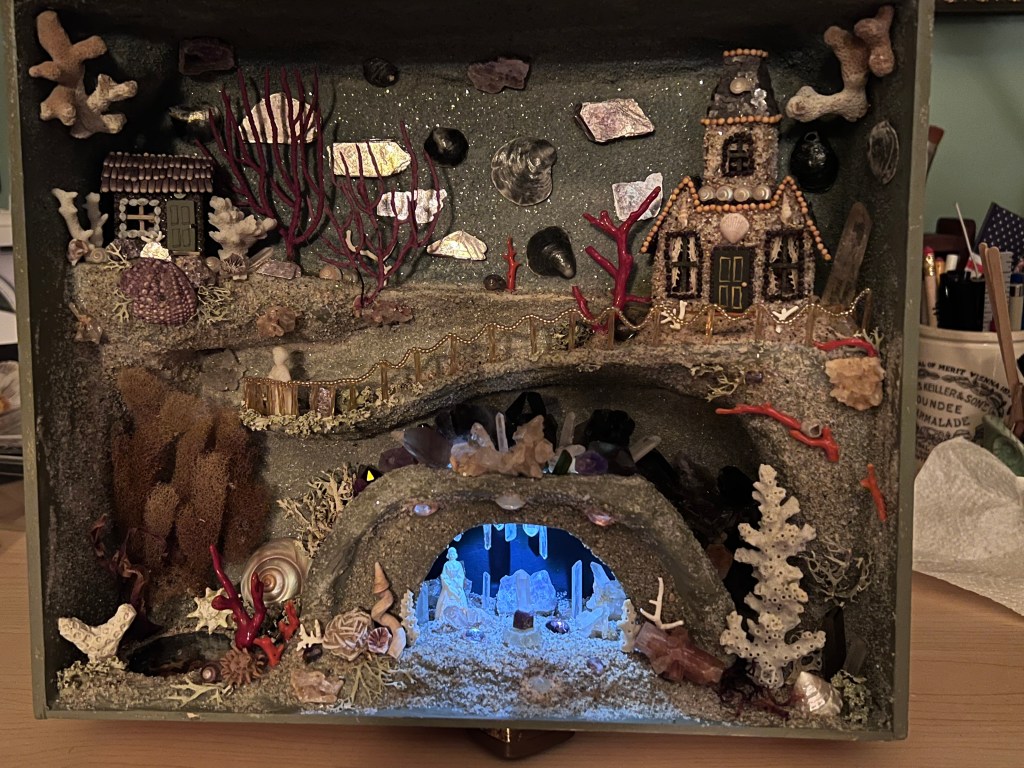
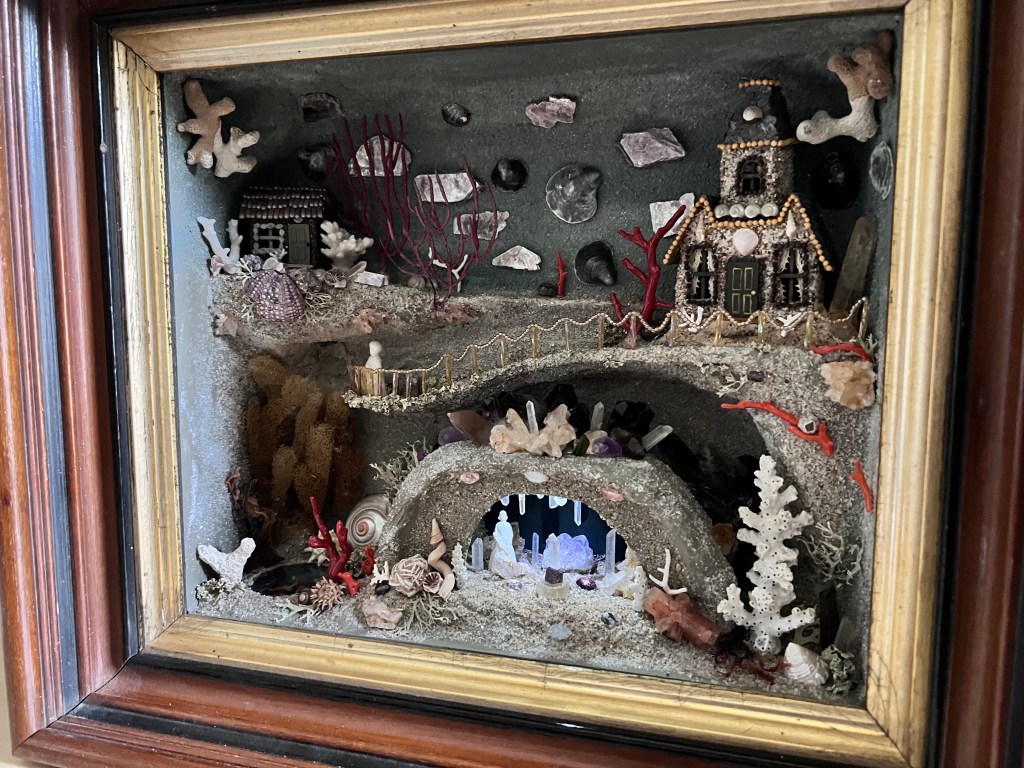
The next box, housed in a Victorian box frame is loosely inspired by the Painshill grotto in England. Painshill is an 18th century man-made crystal grotto with strategically placed cut outs to let the light in. This is the first box that has a light source added. In person, the light isn’t as blue as it appears in the pictures. It includes a sandy, shell themed world with a glass covered pond and a crystal filled grotto. There are two small houses and lots of shell, coral, moss, seaweed and mineral accents along with a fence made of glass beads. The total size is 13.5 x 15.5 inches. I really had a fun time creating this one…sometimes it was like a moonscape and sometimes like an underwater world.
Views in the making.


Interior views.


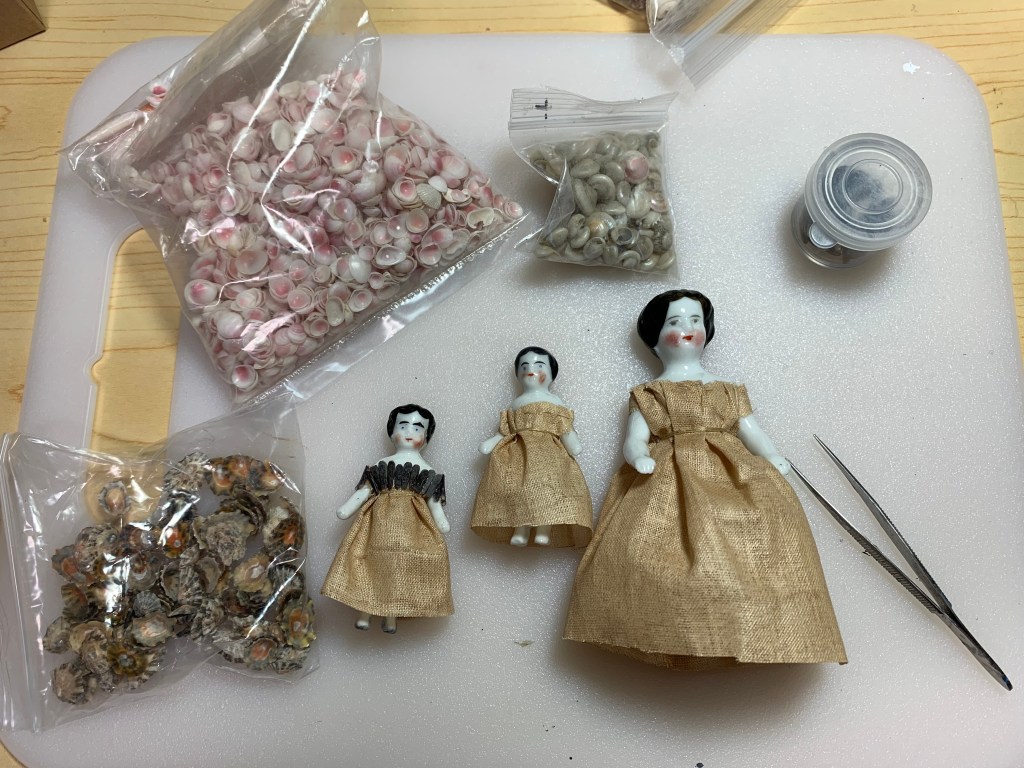
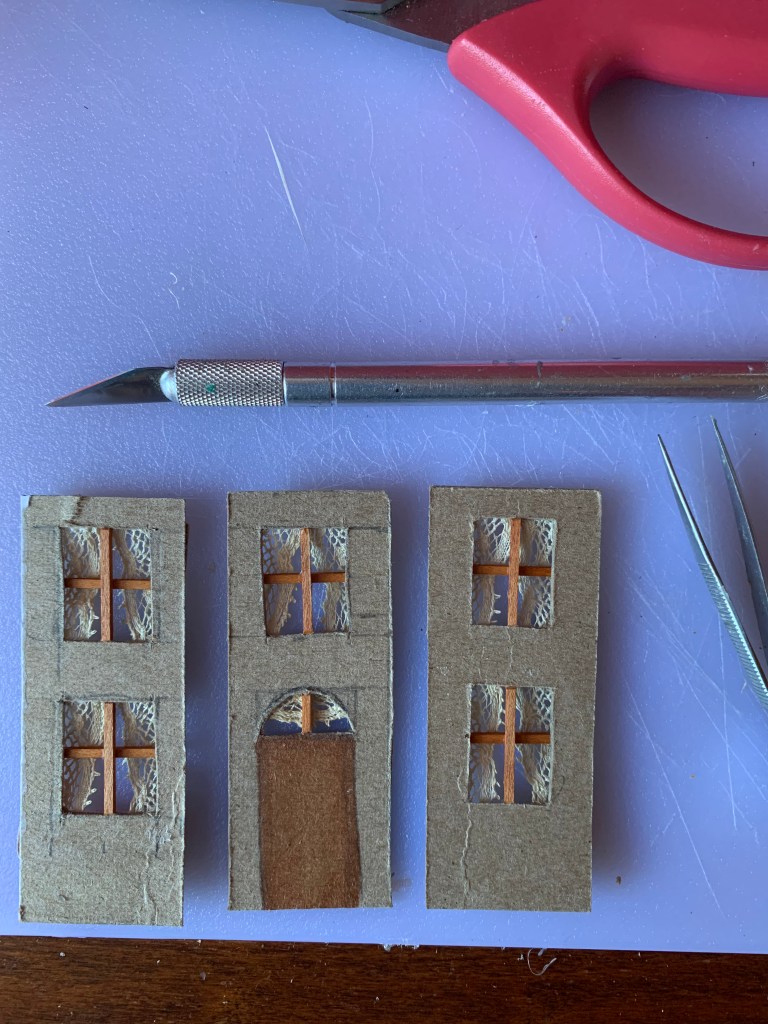
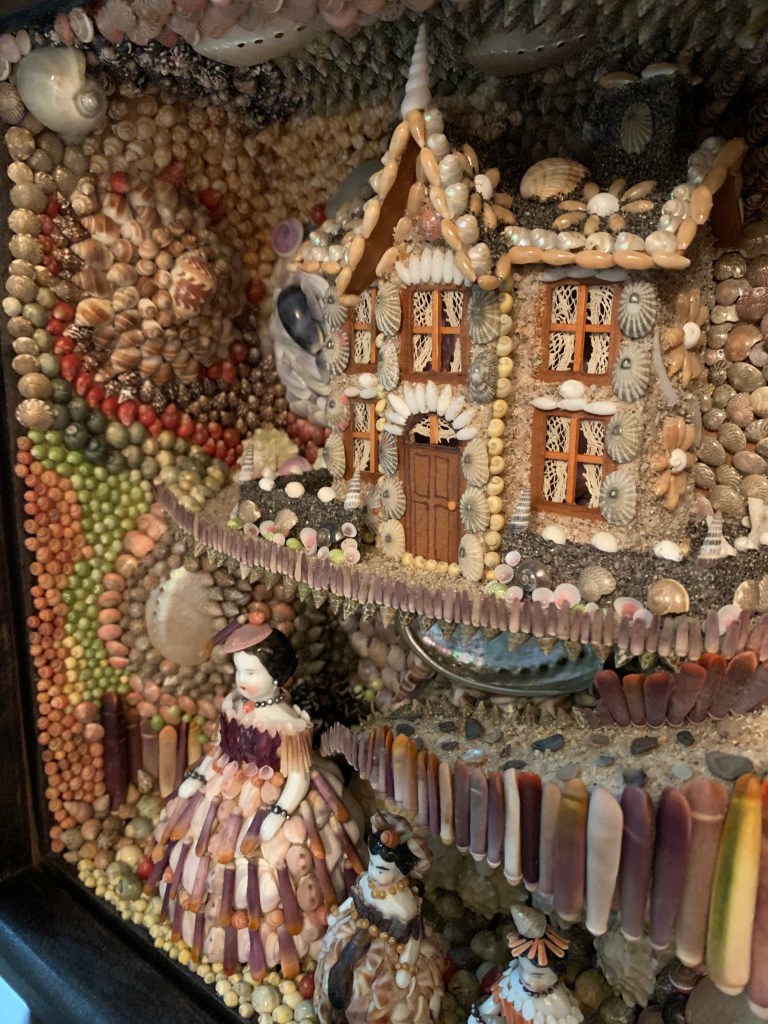
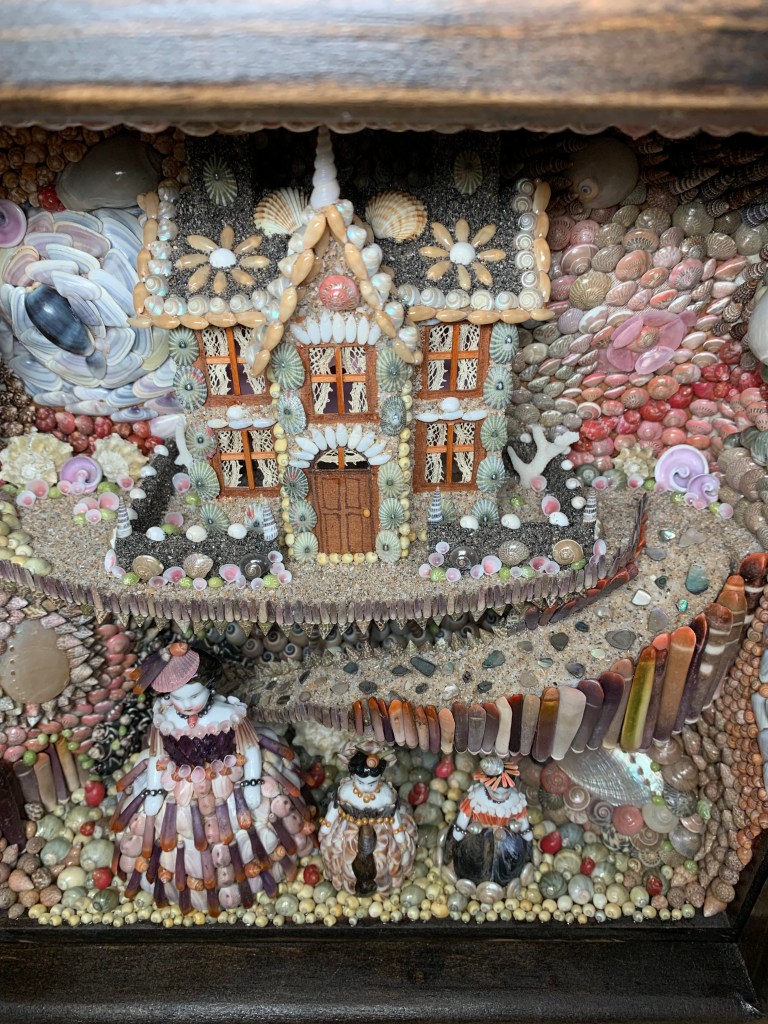
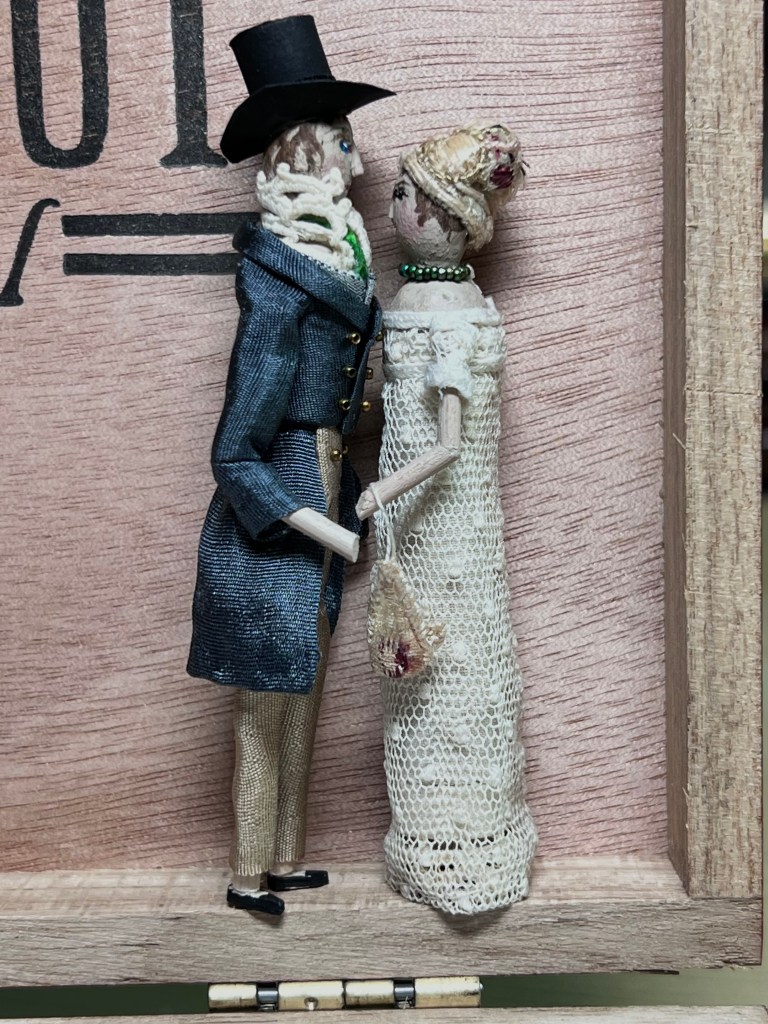
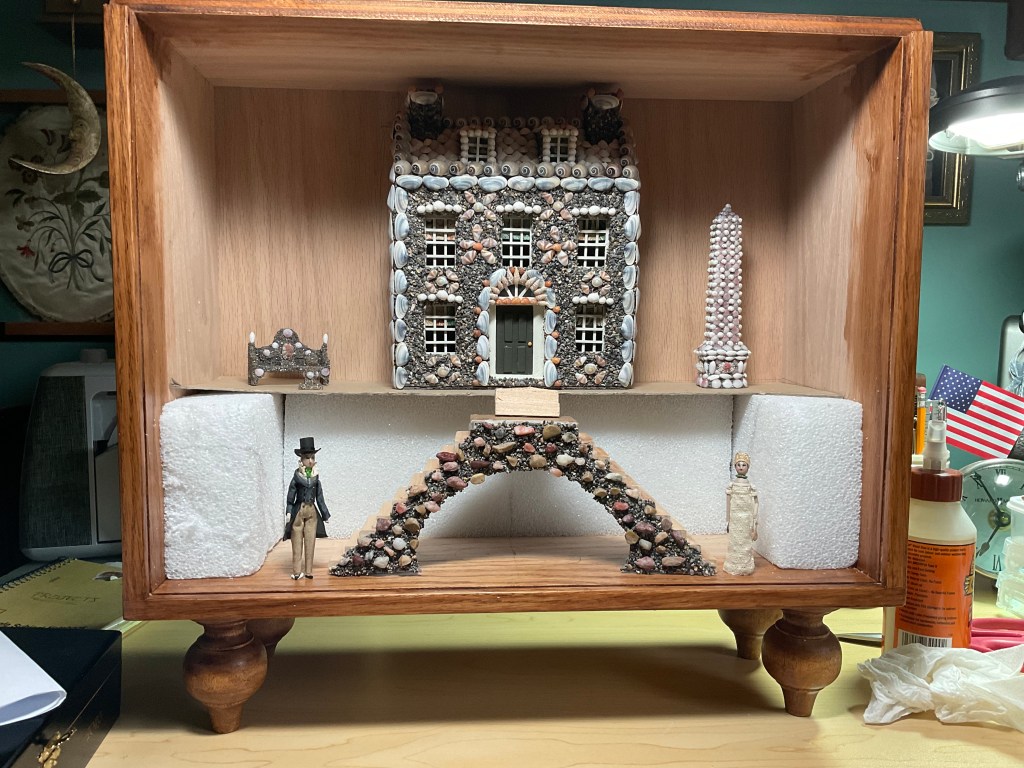
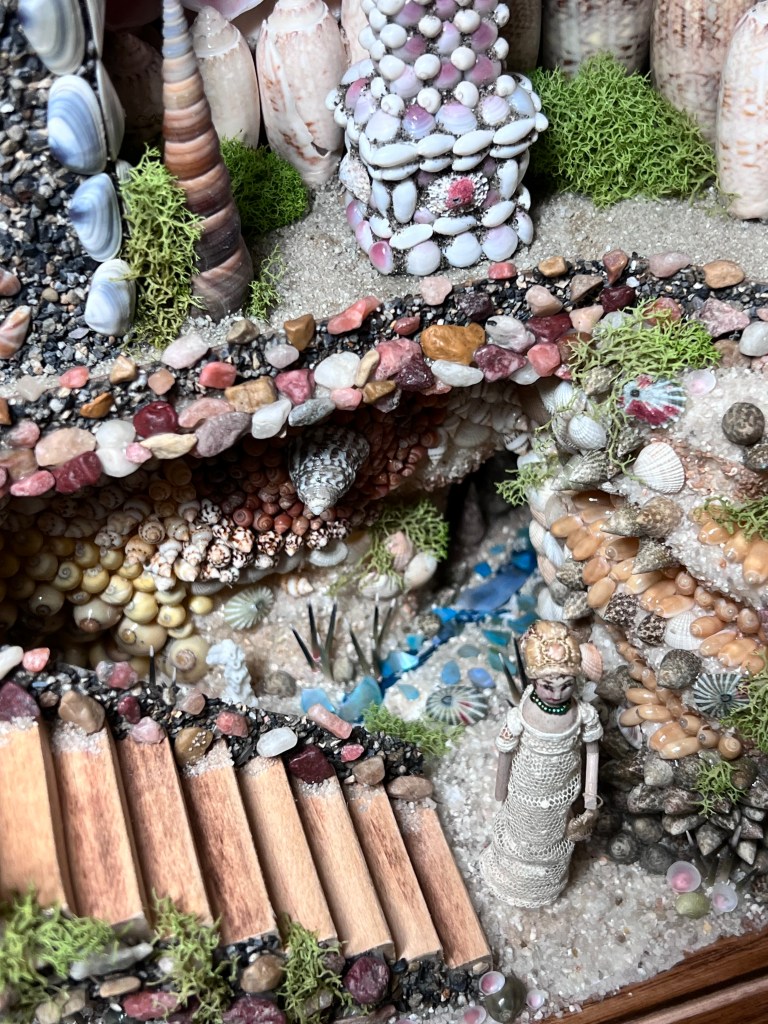
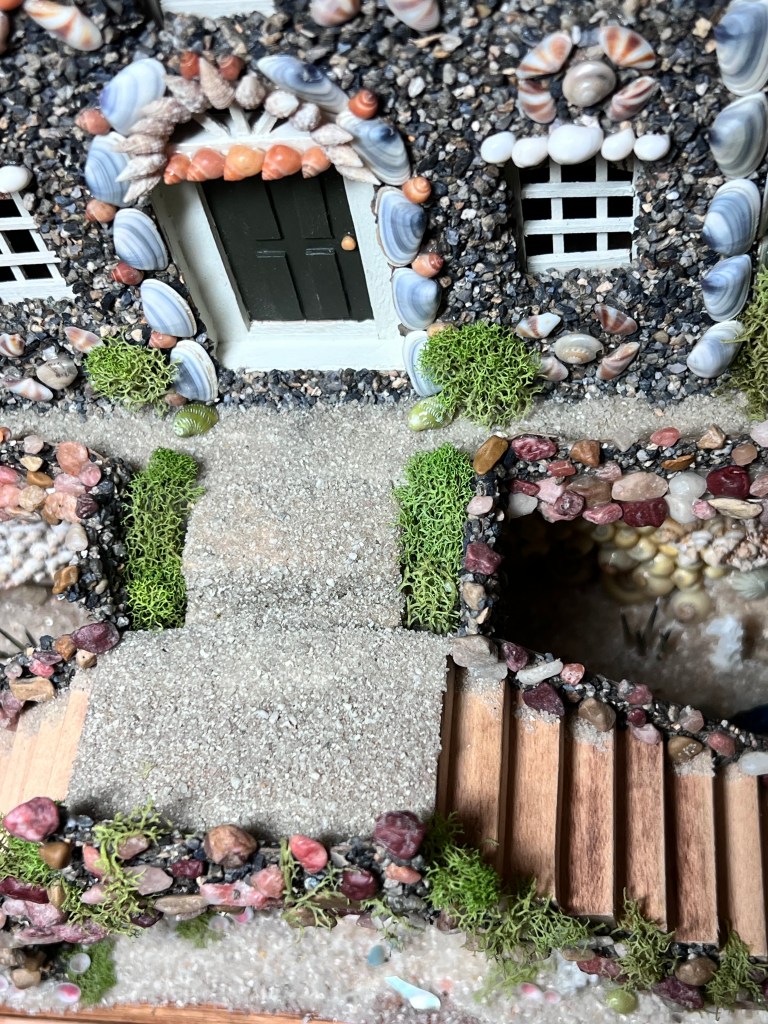
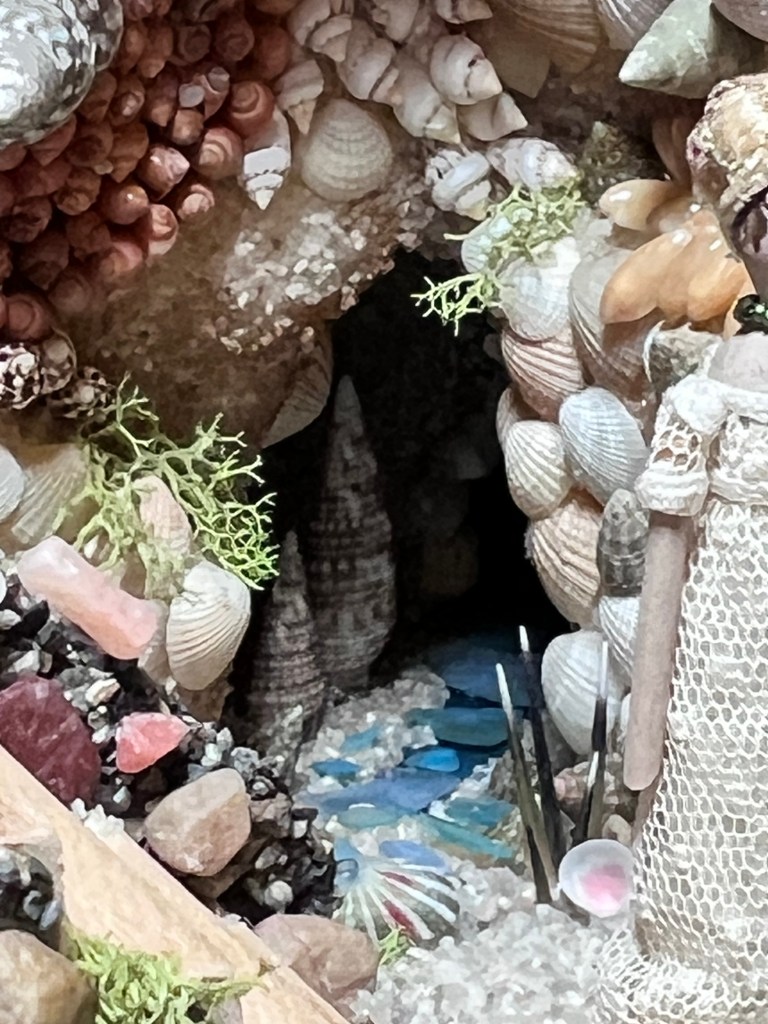
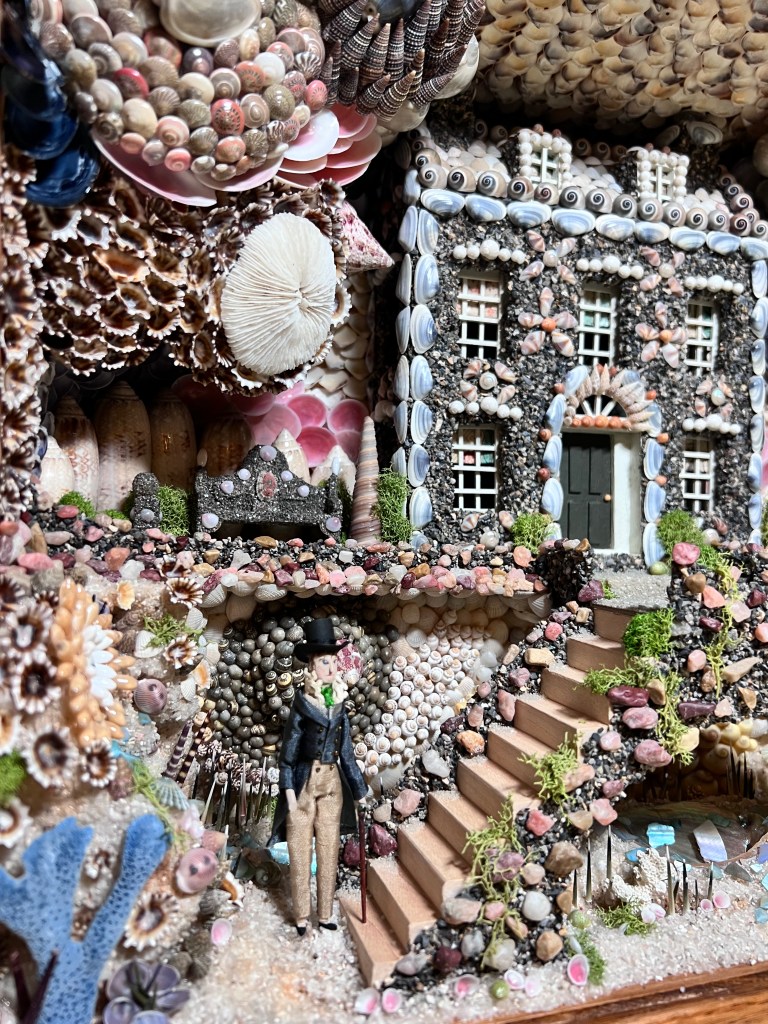
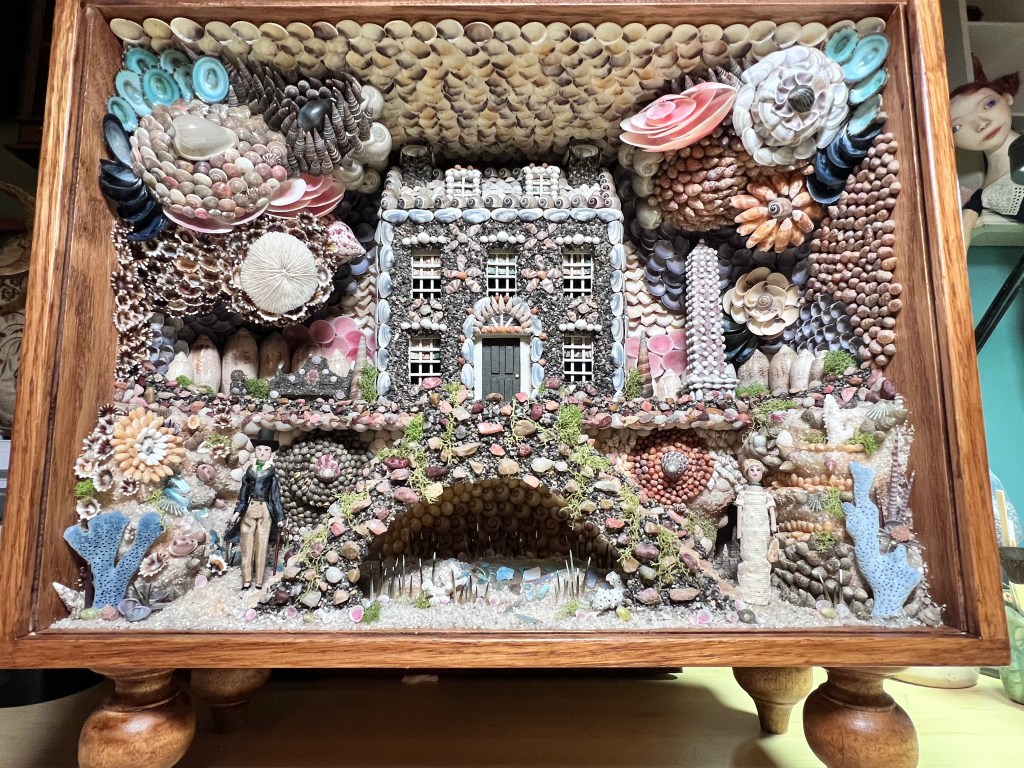
Regency Shell Scene…
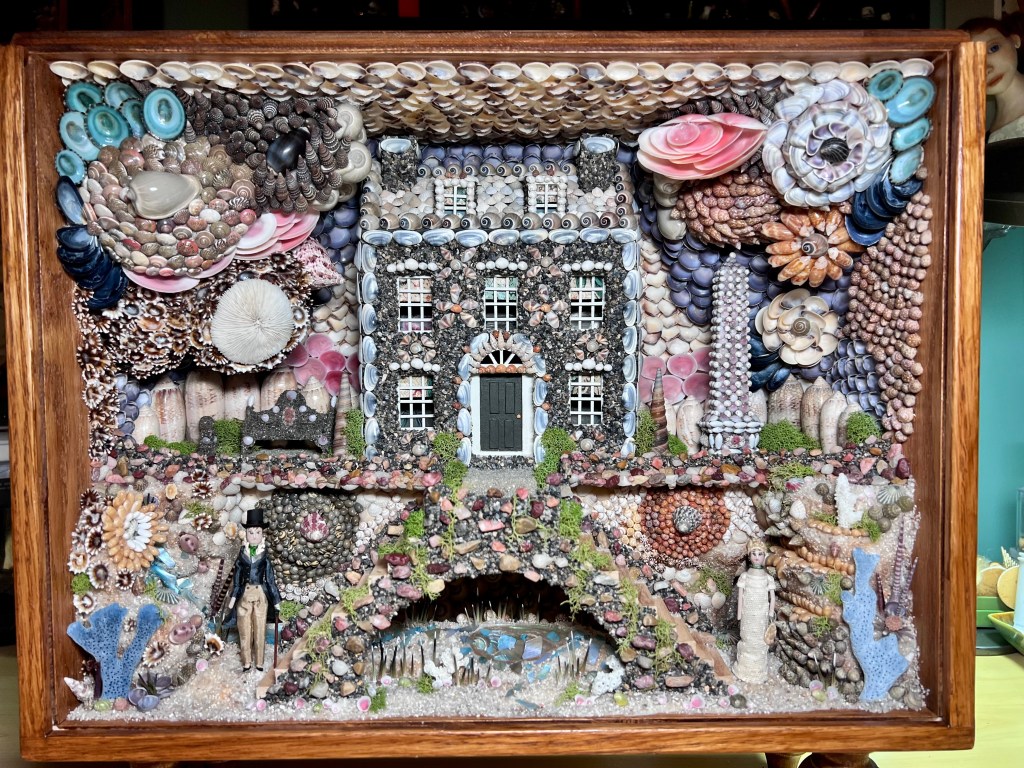
I decided I wanted to make a large and intricate shell box. I had a box made that is 16x12x6 inches. This one took over 125 hours to complete but I enjoyed the process. First I made the wooden Regency styled figures then set out to make the world they would live in. I tried to keep everything in the Regency style – the house, and garden decor including a shell covered obelisk. Most of the decor is shell related, but there is some gravel, stones, sand and moss.
Some views in the making.


Interior views.


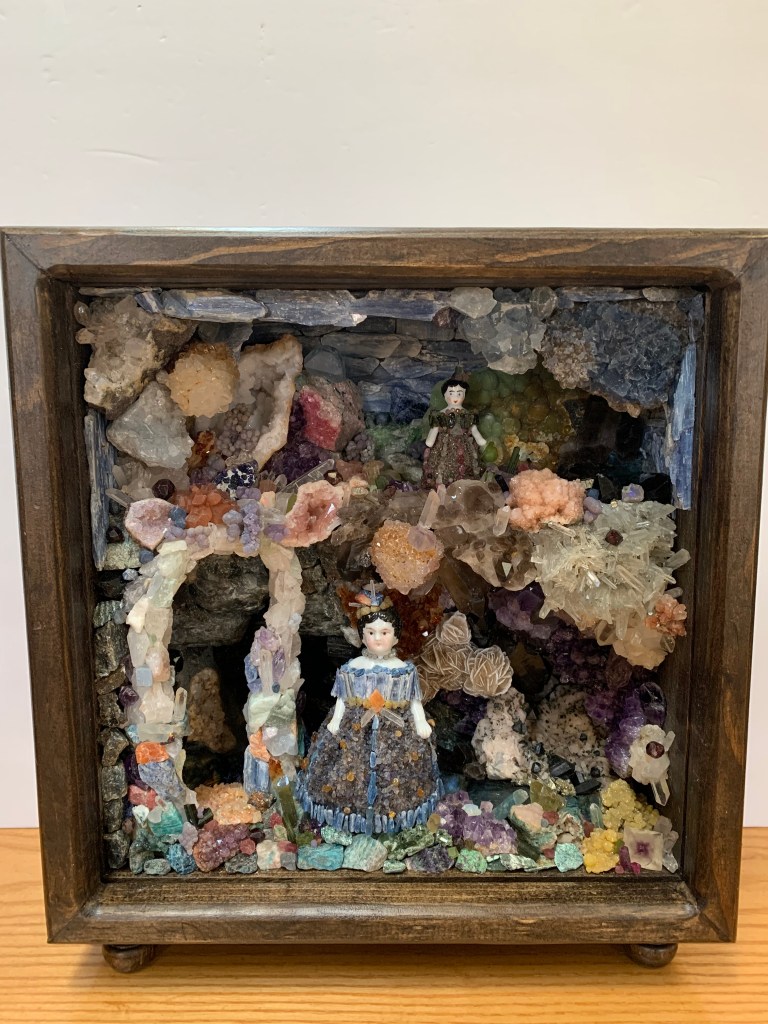
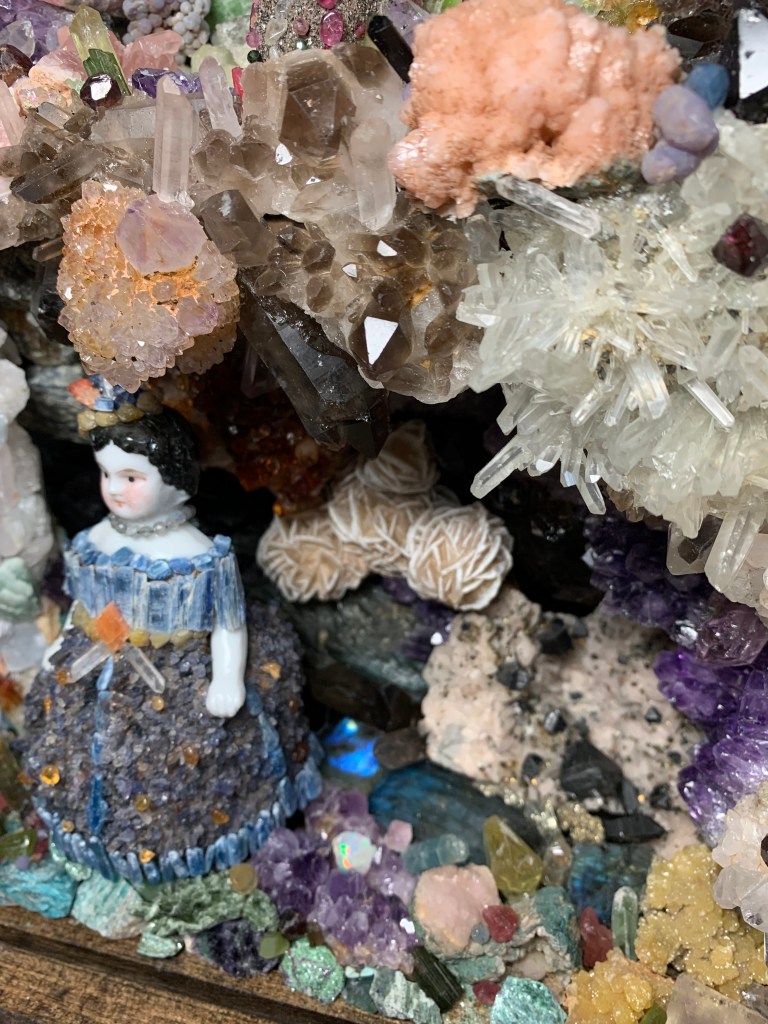
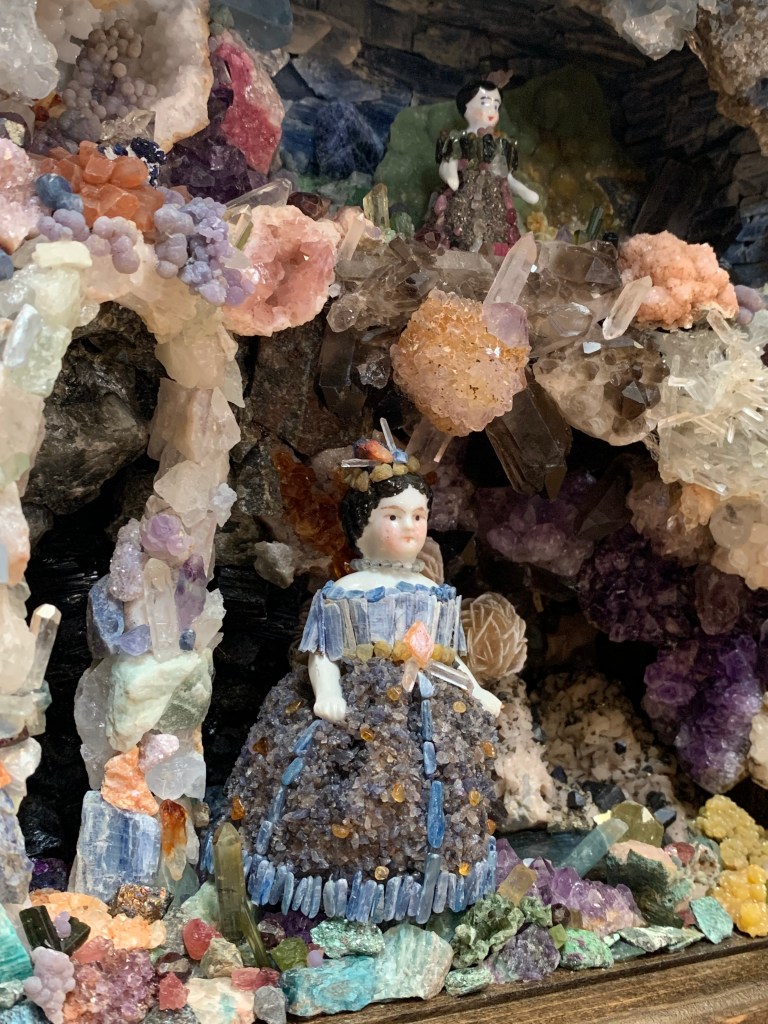
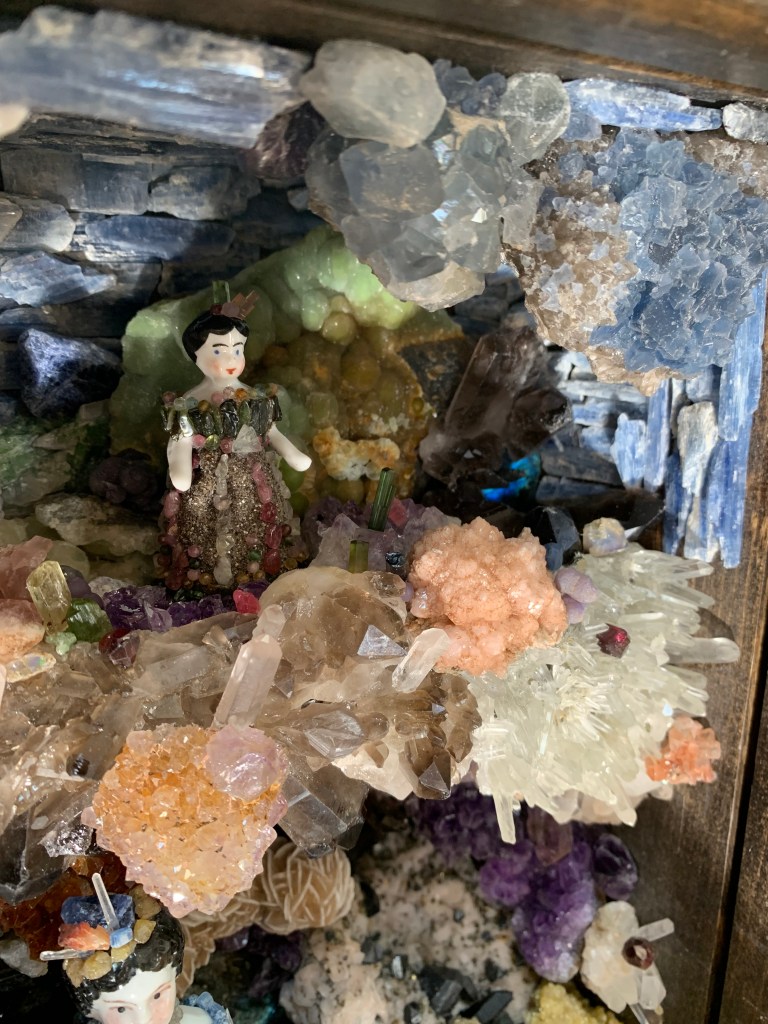
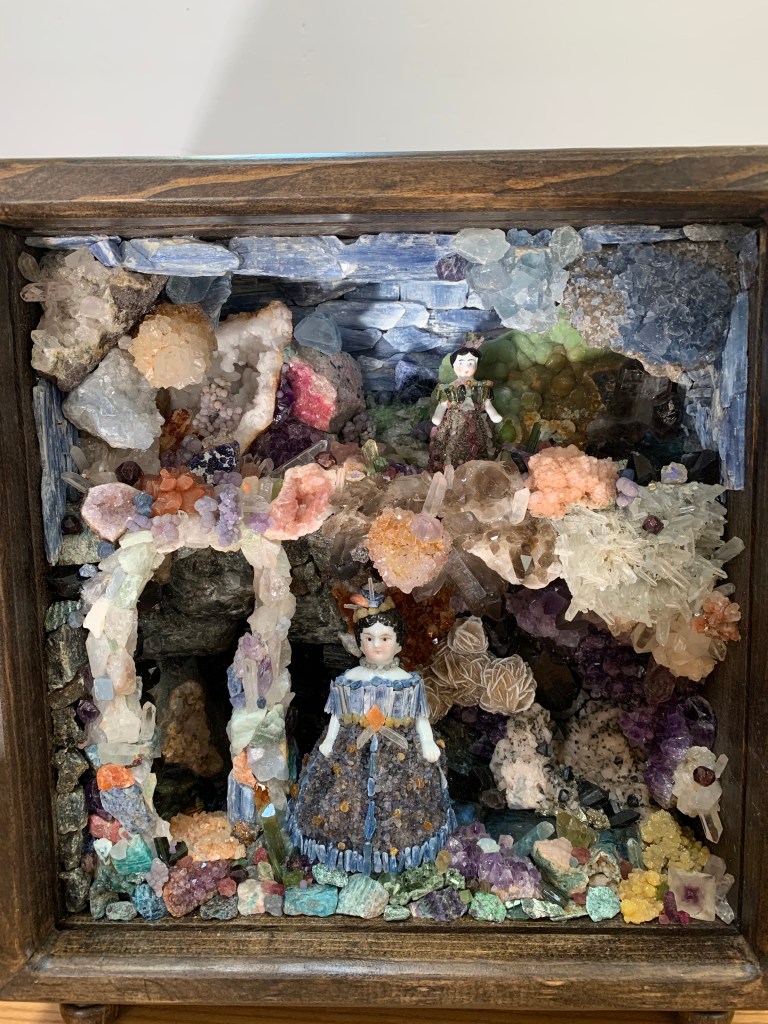
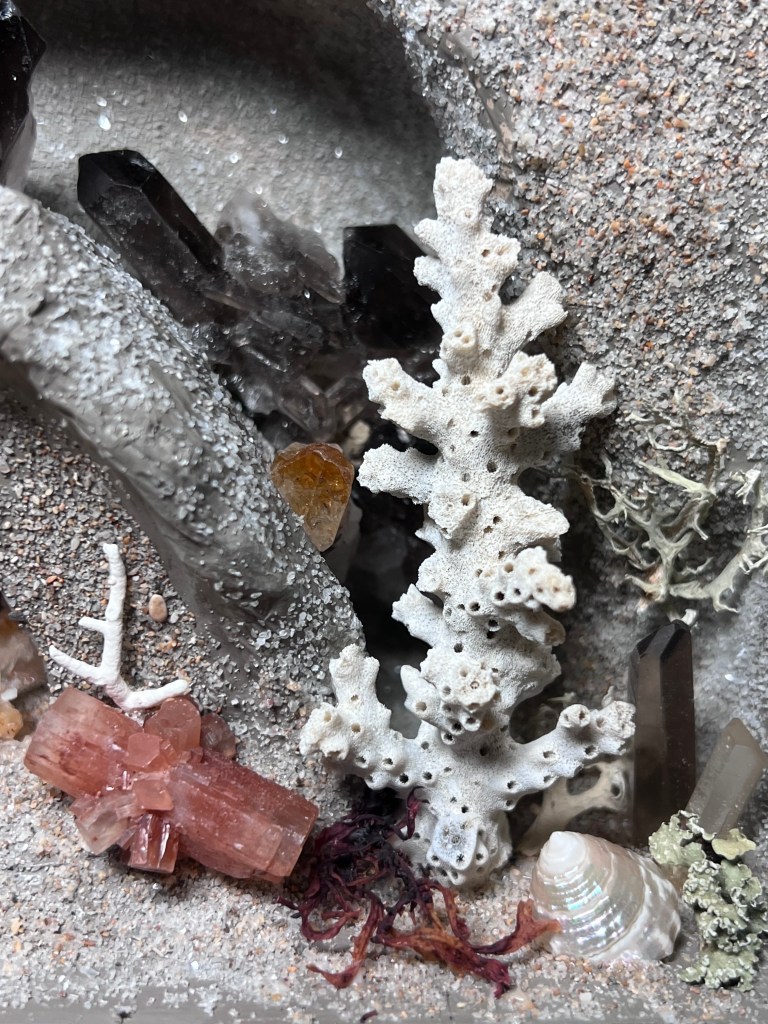
Crystal and Mineral Grotto…
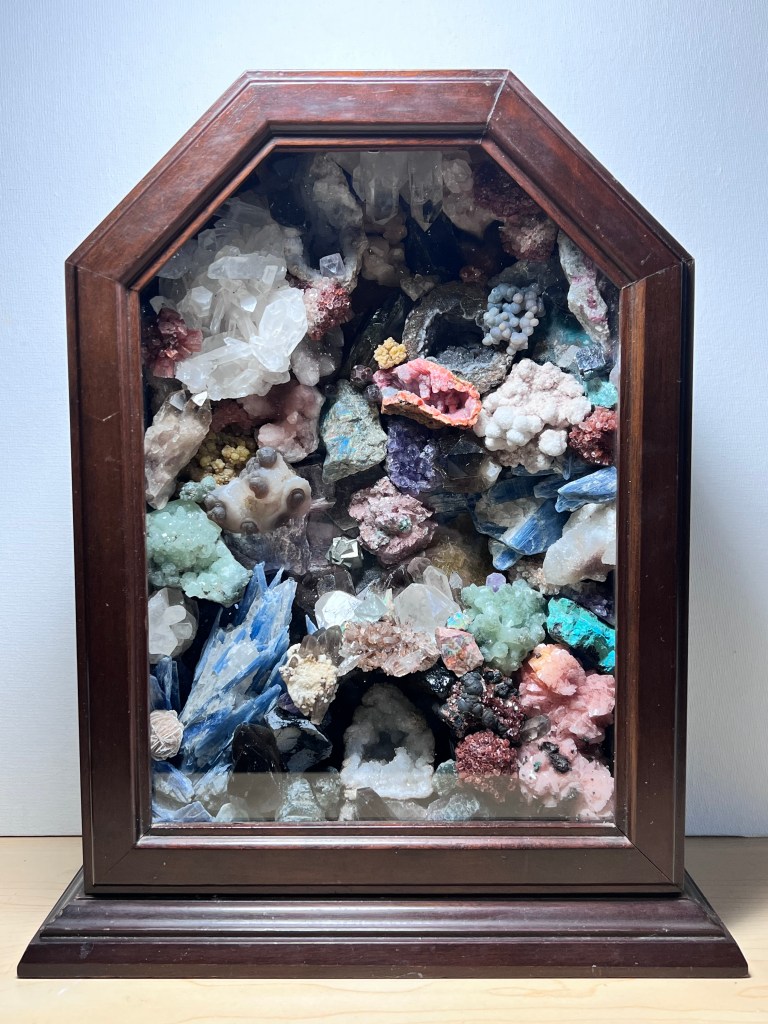
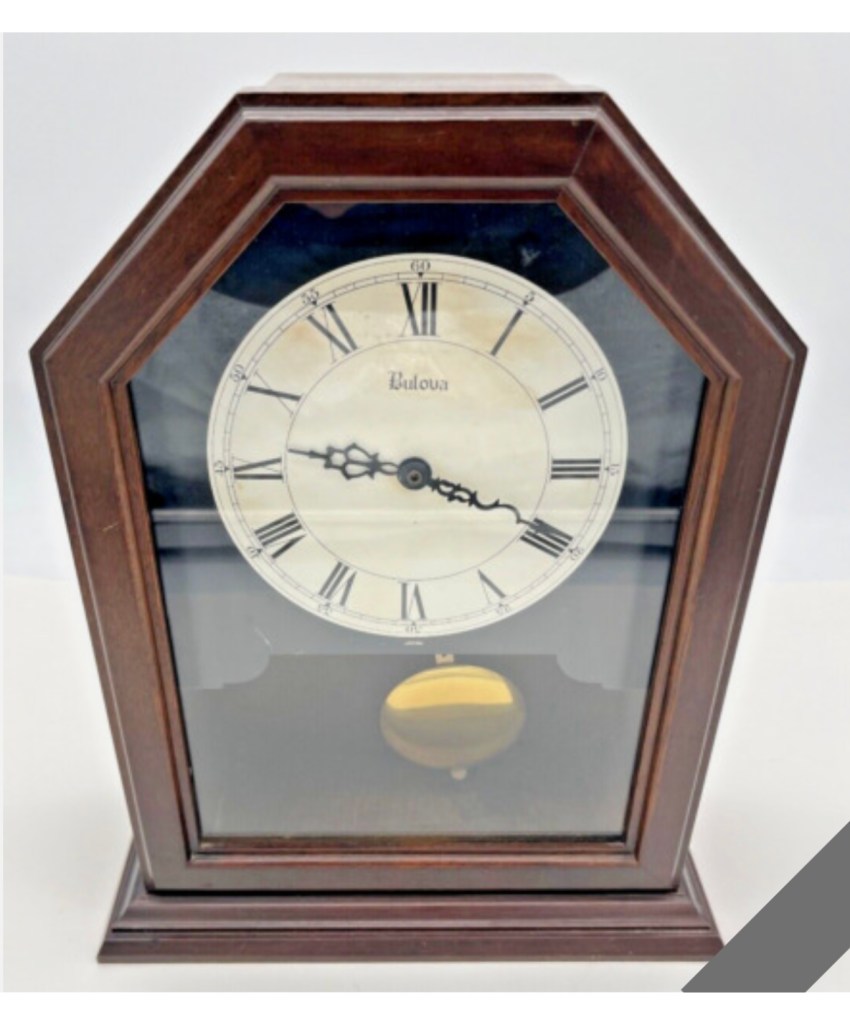
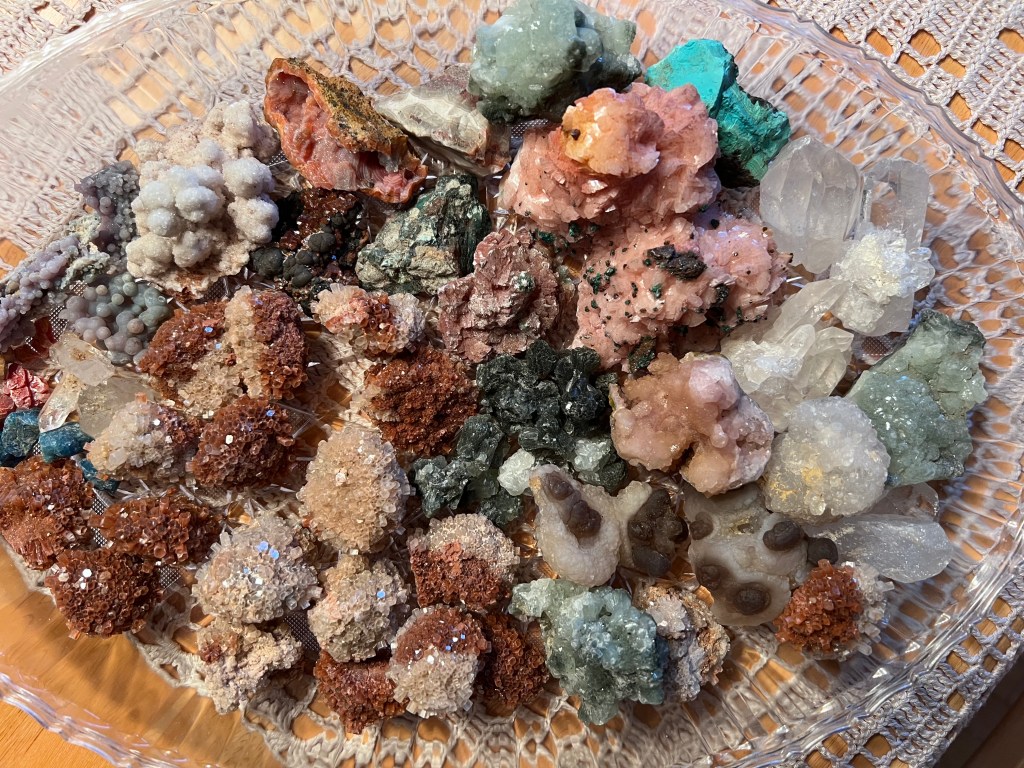
The last piece I’ve worked on so far was another crystal/mineral piece. I still had some specimens left from the earlier box, but stumbled upon a source for some really nice pieces that were super reasonable – so I couldn’t resist getting them. I’d seen a few 19th century pieces – they are generally formed on an obelisk or into some type of architectural structure. I saw one piece beautifully framed, so I decided to go that route. I found a broken clock and used the case for the frame. This piece also has a light source lighting a crystal formation on top and the sort of grotto portion at the bottom. I love all of the beautiful crystal and mineral specimens – this one is also very heavy! Unfortunately, photos just don’t do the minerals justice – they are amazing in person.
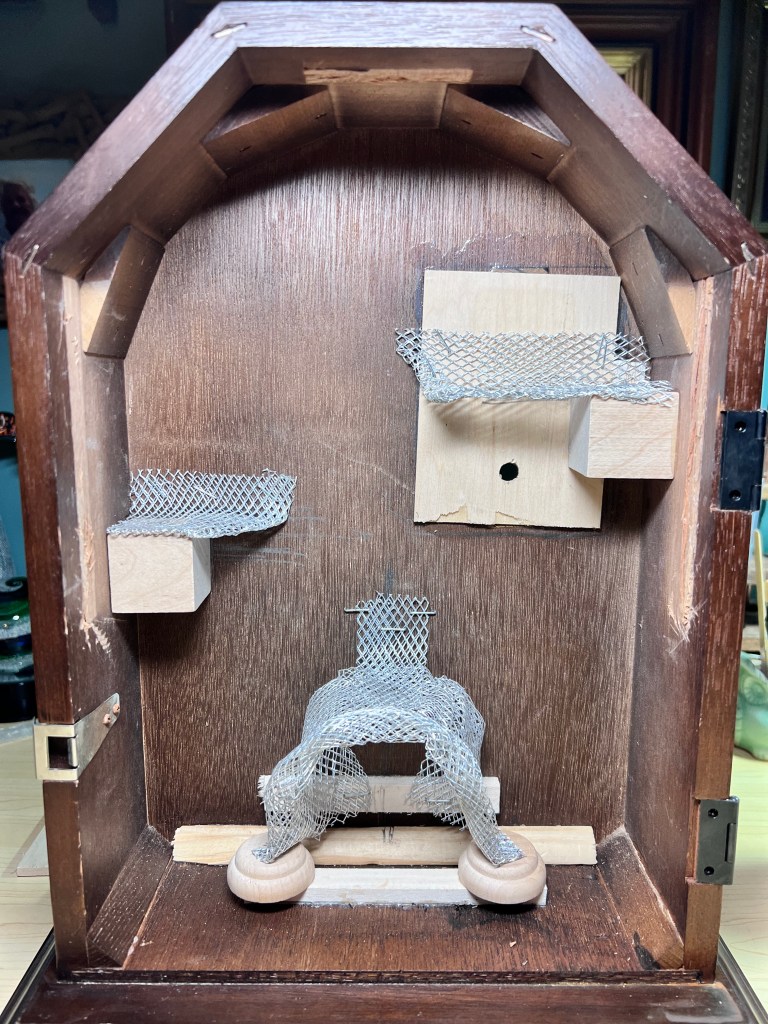
Some views in the making.
Interior views.


